
NOTE: This version of Personal WebSharing not work on Intel-based Macs, as it requires use of either Classic mode on an OS X machine (with Personal Web Sharing–Apache–on that same machine, there’s no reason to do this), or an older, dedicated MacOS 9 machine.
If you have an older PowerPC or G3/G4 Mac, running Personal WebSharing under MacOS 9 is a very viable option, and worthy of your consideration. Running simple static, low-traffic websites requires very little in the area of RAM and processor speed.
Personal WebSharing (PWS) under MacOS 9 is incredibly easy to use (actually, for simple web sites, Apache under MacOS X is real easy, too). This could be a great application for an older machine. Be aware, however, that PWS, being an older product, is more vulnerable to attack by people who have nothing better to do than mess with your web site. There are no new patches or fixes for known or unknown vulnerabilities.
That said, let’s look at installation and configuration of PWS for MacOS 9.
First, boot your MacOS 9-based Mac (we are presuming you already have installed the operating system and are ready to load the web server software), and load the MacOS 9.x installer CD. Double-click the Software Installers folder. Then, double-click the Personal WebSharing folder. Read the “About Personal Web Sharing” SimpleText document for any special news or issues you may need to know about. If you are ready to install, double-click the “Installer” icon. Agree to the software license, and make sure the Easy Install shows in the upper left of the “webscript” window. Install on your default hard drive.
I’m not positive where it will install the operating folder on a MacOS 9 machine. When installing under MacOS 9 (Classic Mode) on an OS X machine, it places a folder called “Web Pages” in the Documents folder, under the top level of your hard drive. I don’t have an OS 9 machine running anymore, so I’m not 100% sure where it will install this folder, but the configuration steps (next) should show you the installation location.
Let’s configure your new web server.
In MacOS 9, go to the Apple menu, and select Control Panels. Launch Personal WebSharing. You will see the following menu:
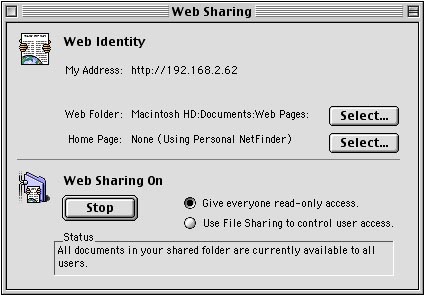
As you can see, the Web Folder location is shown here (next to the first “Select…” button). This folder is where you will put all your HTML and graphics files. It is also where Apple has placed several excellent tutorials (About Personal WebSharing.htm and Using Personal WebSharing.htm), as well as a default web page that you can use to verify the server is working (more in a moment).
One of the most important security settings is next to the Start/Stop button on the PWS control panel window. There are two radio buttons: Give everyone read-only access, and Use File Sharing to control user access. If you want a wide open web site that anyone can access, use the first choice. If you want to set up access permissions (beyond the scope of this article), use the second choice.
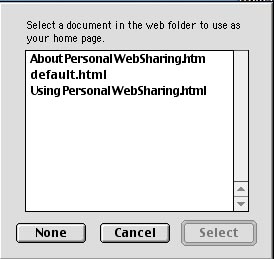
For PWS to function properly, you will need to tell it what your default home page will be (usually a file named something like index.html, default.html, etc.). To do so, click the Home Page button (the lower of the two “Select…” buttons). This brings up a new window (below). Select the file (for this test, use default.html) and click the “Select” button.
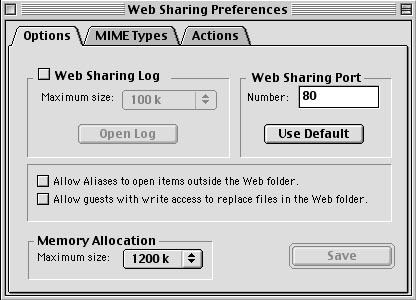
If you want, you can go to the Edit>Preferences menu item and look around. You probably won’t need to do anything here, unless you want to have PWS generate a log file of everything that goes on (maybe useful), to change the default port (don’t do it!), allow Aliases to open items outside the web folder (probably not a good idea for security reasons), and allow guests with write access permissions to replace files in the web folder (also not a good idea). MIME Types tab? Leave it alone. Actions tab? Leave it alone. If you have made any changes, click the “Save” button. Otherwise, click the close button at the upper left of the window.
To start the web server, click the Start button on the main PWS control panel. To test it, open your web browser and type http://localhost. If you get the Apple file named default.html, you got it right.
Obviously, you don’t want to broadcast a website with just Apple’s default.html file as your content. You want to create your own. Hopefully, you were working on that long before you began planning on the hardware/software equation. You will need to write your web pages in HTML. You can do so with a number of excellent commercial tools, including iWeb (part of the iLife package), Dreamweaver, GoLive, Freeway, PageSpinner, and more. There are also plenty of freeware, open source, and shareware products out there. Check out versiontracker.com, and mymac.com for more information.
If you want to “roll your own”, by writing your own HTML code, my favorite book of all time is Creating Cool HTML 4 Web Pages, by Dave Taylor. I think I have that coded so MyMac.com will get something if you order through this link. I have used this book for years. For me, it was the clearest, easiest book that had all the most-used functions in one place, and I bought a lot of them. It shows the standard method in which you arrange your HTML files (HTML files at the top level, and graphics in an “images” folder), which helps you organize your files. It taught me how to easily make tables and forms–something that had given me problems for years. I have given this book as a gift to many budding web authors. For a computer book to remain in print for over five years is amazing–this book deserves remaining in print.
Next time, we do the same thing, using Apache (Personal Web Sharing) on MacOS X.
Leave a Reply
You must be logged in to post a comment.