
First off let me preface this how-to article by pointing out that this is my own little ongoing effort to learn AppleScripting and Automator. So the automation I’m describing probably could be rewritten and refined by someone with more skills in the area. If you have a better way of creating this automation, please share it me and other readers.
Typically when I download a pdf, QuickTime, document file, I have to open up my download folder to get the file. Sadly, you can’t just click on the download folder in the Dock and it springs open. You have to command-click the folder in order for it to open. I think that’s a waist of time. So I figured out a way to have the folder open up when a file is downloaded into it. It’s a neat little time saver that should be a folder action option built into the system.
Anyway, here’s my method for automating this process. This how-to assumes that you’re running OS X Leopard, but it will also work if you’re using Tiger.
Open Script Editor (found in Applications>AppleScript>Script Editor) and Automator which is also in your Application’s folder.
1. Open and close your Downloads folder a couple of times.
2. Now go back to Script Editor and create a new file. Click the Record button on the far right of the menu bar of the Editor.
3. Click on your desktop and then click on the Go menu in the menu bar of your Finder winder. Click down to Recent Folders>Downloads. It should be there because you just recently opened it.
4. Go back to the Script Editor and click the red stop button. After you click this button, you should get a script that looks similar to this one:
tell application “Finder”
activate
make new Finder window to folder “Downloads” of folder “bakari” of folder “Users” of startup disk
end tell
5. Now click the Compile button in the menu bar of the Editor. Next, click the Run button to see if the script indeed opens up your Downloads folder.
6. If everything is working okay, copy your script to the clipboard. If you didn’t get the results you need, simply delete the script and try again.
7. Now open up Automator. When the Starting Points screen appears, click Okay for a Custom workflow.
8. Click on the Files & Folders actions in the far left column of the Automator interface. Scroll down the list of actions and select Get Selected Finder Items. Drag that action over into the larger workflow window.
9. Go back the first column and select the Utilities actions. Scroll down and select the Run AppleScript action. Drag and drop it into the workflow window also.
10. Delete the script code in the Run AppleScript window and replace it with the Apple script that you copied in step 6. Just click Command-V and it should appear in the box.
It should look like this:
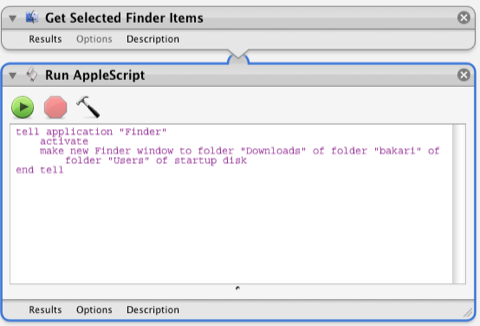
11. Click the Run button in the far right of the menu bar of Automator to check the workflow . It should again open up your Downloads folder.
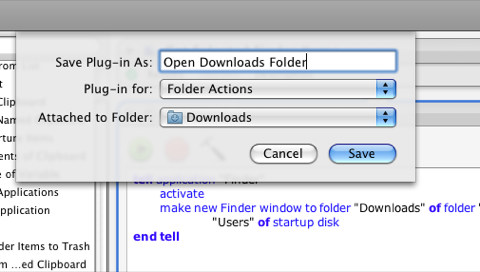
12. If it works okay, click on File>Save As Plug-in. Select Folder Actions from the drop down menu. Where it says Attached to Folder, select Downloads from the drop down menu. This of course is the folder in which the action will be applied and ran. Type in a title for the file name, such as “Open Downloads Folder.”
13. Now test it out. Download something from the Internet that should go straight to your Downloads folder. Or you can simply drag a file from your desktop onto your Downloads folder in the Dock. When a file is added to the Downloads folder, the Automator workflow should run the AppleScript and open up your Downloads folder in about 2-3 seconds.
14. If something doesn’t work right or if you decide you don’t want to use the workflow after all, simply go to the Home folder>Library>Workflows>Applications>Folder Actions. Delete the folder action that was saved there.
That’s it. This workflow should be a nice little time saver for opening up your Downloads folder when something is added to it.