![]()
Photogene
Company: Omer Shoor, Developer
Price: $2.99
http://www.i-photogene.com/
Professional Image Editing Tools for iPhone/iPod Touch
When it comes to actual on-board editing and “fixing†photos taken with an iPhone, there are many apps to choose from, but none is more complete, powerful and practical as Photogene by Omer Shoor.
I always emphasize to my photography students the importance of capturing images correctly IN CAMERA so that computer time is minimized. As much as we love interacting with our beloved Macs and tweaking and fixing our photos in Photoshop or other image editing program, we (and our photography) are really better off using that time to shoot more photos and improve our technique. To be an accomplished photographer, you need to understand proper composition and exposure techniques, and always consider the quality and direction of light. As for the iPhone camera, many will criticize it as being inferior and chintzy. Guess what, they’re wrong! Yes, it’ a 2.3 megapixel sensor, but it’s a fine camera! The megapixel thing means very little these days. With a basic understanding of some proper photography technique, anyone can capture compelling, award-winning images with ANY camera. See … www.TheBestCamera.com for some examples of fine iPhone photography.
Inevitably, anyone serious about photography does need to fiddle around with images. For example, situations may arise where we might need to get a “grab-shotâ€; capturing some fleeting moment where there is no time to give much thought to setting up the shot. Or perhaps, in situations where the lighting is just not right, resulting in low-contrast, underexposed pictures. And maybe, we took some shots that turned out crooked or the composition was not what it could have been, and the image needs to be straightened and cropped to fix these issues.
Of all the iPhone apps I have tested and used so far (over 60), the one that I keep turning to for “post-processing†is Photogene. This image editing app has been out for quite some time and is a full-featured app that should be in every iPhone photographer’s arsenal of photo utilities. As an aside, Photogene was chosen as one of Apple’s favorites when the App Store’s one-year anniversary came up. It also received PC Magazine’s Editor’s Choice Award and was recently included in O’Reilly’s Guide to the Best iPhone Apps as best app for editing photos.
When starting up Photogene, you are given several choices about your image editing session. You can continue working on your previous session, which is very convenient for photo editing “on-the-go!†As with other photo apps, Photogene also lets you capture an image directly from the camera by relying on Apple’s camera API. Finally, you can select any image from the on-board Photo Library. (And so, iPod Touch users are also able to use Photogene).
The photo you want to edit opens in Photogene’s “desktop.†You can move the image around the screen and zoom in and out using common finger gestures right on the screen. Photogene can be used in either portrait or landscape mode on the device which is nice for editing photos taken in either camera orientation.
There is a sidebar containing all the editing tools: Crop, Rotate, Color Adjust, Filters, Symbols and Frames.
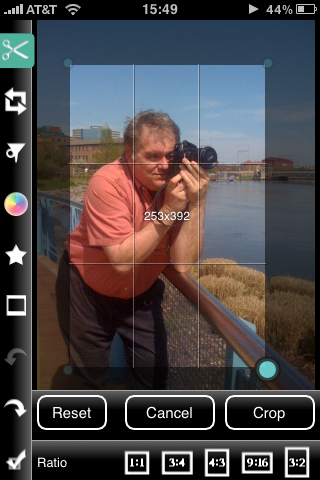
Crop – Cropping couldn’t be simpler. Once you tap on the crop tool, crop marks appear on your image with “handles†on each corner so that you can adjust your crop as desired. Here’s a nice touch: as you crop, the pixel dimensions appear in the center. You can also perform your zoom pinch-open and pinch-close gestures while cropping for that perfect crop. You can either crop free-form or you can select from common crop aspect ratios; 1:1, 3:4, 4:3, 9:16, 3:2.

Rotate – You can also rotate and flip your image with the familiar rotate, flip horizontal and flip vertical commands. What is commonly missing in similar apps, but present in Photogene, is a free-rotate slider. This is where you can precisely rotate your image to straighten it. This is typically used to fix a crooked horizon or cityscape. A nice touch is the inclusion of guidelines that appear on the image you are straightening. These help you get the job done just right.
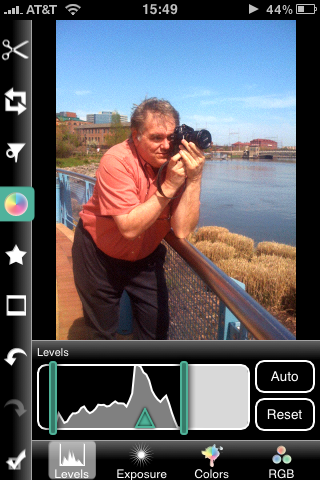
Color Adjust – My favorite adjustments, which is a must-have for any serious photographer, are found in the Color Adjust tool, providing you with several professional editing options. This tool leads you to four panels: Levels, Exposure, Colors, and RGB.
I bask in digital happiness within the Levels Panel! Present here is the all-important tool – the Histogram and Levels Adjustment. Most applications on the Mac and iPhone will offer single-shot brightening and contrast tools which are very limited and to be avoided. Levels and the more advanced Curves, where available, are the tools to use for maximum flexibility in the fixing of exposure, contrast and color cast issues.

In the Exposure Panel, Photogene does give us sliders for exposure and contrast, but I ignore those completely in favor of the Levels Panel which lets me tweak exposure and contrast with more precision, attention to detail, and flexibility for creative freedom. Speaking of detail, Levels is useful for pulling out a little detail from shadow areas in particular, but also a bit from the highlights. There is an Auto Levels tool as well, but why use that when you can have more control tweaking image tonalities with the full Levels input controls for black point, mid-tones and white point?
The Color Adjust tool also houses the Colors Panel. There are slider controls for Color Saturation and Color Temperature adjustments. Saturation is for changing color intensity or richness. You can either kick up the colors a notch or two, or you can de-saturate and remove some or all color to convert to a black and white image. The Color Temperature slider is for warming up an image by shifting it towards the warmer range of yellow to red color tones. Cooling is the opposite; adding blue to tone down a warmish color cast. These can be used also when there is no proper white balance adjustment in photos resulting in, for example, warm color casts when photographing indoors, or cool, blueish casts when photographing snow scenes under blue skies.
There is also an RGB Panel within the Color Adjust Tool. It allows you to make finer color-cast adjustments for even more difficult lighting situations – like fixing the greenish cast produced by fluorescent lights. This is done by reducing the amount of green using the green slider. Additionally, if you really want to make black-and-white images that really pop with lots of depth and good detail, use the RGB sliders along with the Saturate slider. First you de-saturate your image with the Saturate slider. This gives you a flat, monochromatic image. Then, go to the RGB panel and play around with the RGB sliders to get the desired black-and-white tonalities. Throw in a bit of contrast with the Levels adjustment. Be sure to zoom in with the open-pinch gesture to closely examine the results of your adjustments. For any of you photography old-timers out there, playing around with the RGB sliders on a monochromatic image is similar to back in the day when we used to attach color filters on our cameras running black-and-white film. If we wanted to darken a blue sky, we would use a red filter. If we wanted to lighten green trees, we would use a green filter, and so on … Well, in the digital photography world, we can, for example, increase the red RGB slider to darken blues (or lighten reds).
Filters – The next editing tool is the Filters Tool. Within this tool can be found the Sharpen, Pencil and Effect Panels. The Sharpening function in Photogene is straightforward; a simple slider that only adjusts the sharpening strength. Unfortunately, we don’t have any more controls than this to make sharpening smarter and more flexible. So, be careful not to apply too much sharpening. However, if you intend to print the image, you might want to over-sharpen ever so slightly. In the end, though, it may come down to trial and error.
The Pencil Panel consists of one slide which applies an artistic filter which makes the picture look like it was actually hand-drawn on white paper with pencil or charcoal stick. For artistic filter effects, there are other apps that offer many more options and much more flexibility. I view Photogene as more of an exposure editing tool as opposed to filter-applying tool for artistic purposes.
The Effect Panel lets you apply three effects. Sepia is marginally useful for giving a photo that antique look, but it’s an all-or-nothing deal. Negative and Posterize are useless psychedelics to me. I am more interested in tweaking tonalities with the Levels tool than I am making my images look like they were shot during a nuclear holocaust or on Venus!
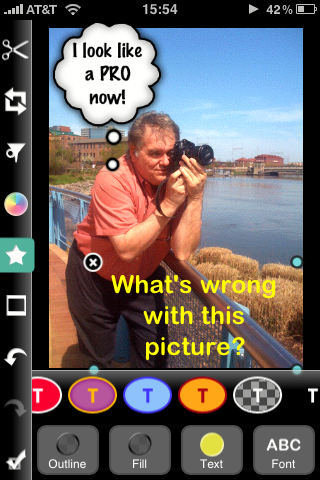
Symbols – Basically, the Symbols Tool allows you to place fully editable text on your image. This can be very useful. You can change size, color, alignment, as well as choose from five different font styles. There are resizable shapes to which you can apply color fills and strokes. You can place and edit text within the shapes. Also available are configurable arrows and comic-book style speech and thought bubbles. Whether you like annotating your images with full-featured text tools and graphic shapes, or just placing a caption or a photo credit, this is the tool for you!

Frames – The Frames Tool gives you access to 15 preset frames and borders – from plain varieties to “sloppy†borders, polaroids and camera film borders. Additionally, you are given the flexibility of creating your own custom frames where you can freely alter the shape, width and color of your frames and borders as well as apply shadow effects for a three-dimensional look. Finally, in this full-featured set of frame tools, you can apply background colors (like a photo mat), and you can give your image one of those reflection treatments that Apple popularized a couple of years ago. A Vignette can also be applied here but can not be adjusted in any way.
***
As you can see, Photogene offers lots of choices and creative flexibility when it comes to fixing and enhancing photos.
When reviewing any image editing application for computers of any size – from desktop to mobile, I always check to see that the concept of “pixel preservation†is adhered to. That is, will the application preserve the original image and work on a copy? As for Photogene, there is good news, and a little so-so news! If you have Photogene open an existing image from your Photo Library, then it will work on a copy. At the end of your session, the newly-edited photo will be saved to the Photo Library along with the untouched original. This is good; it passes the Pixel Preservation test. However, if you have Photogene snap the picture and load the photo directly into the editor, it DOES NOT save your picture to the Photo Library first. In effect, you will be editing an original. Once your edits are done and you save the image, you cannot revert back. This is not good. I would like to see Photogene updated so that you are given the option to immediately save the image once Photogene snaps the picture.
However, all is not lost, because by taking a few deliberate steps before you start editing, you can save your freshly snapped before editing – and I suggest you do! There are two ways to do this. First, and what I prefer doing, is to simply take the picture with the iPhone Camera app, which then saves the image in the Photo Library. Photogene is then launched and the image that was just captured is selected from the Library, opened and edited. The second way is to have Photogene capture the image, click on the “Done†button (the checkmark) and take the option to save the image to the Library, and proceed to editing.
What about undoing any editing changes? In all of Photogene’s tool panels you are given a Reset button that takes you back to the state your image was in before you entered that particular tool set. Also, you have multiple undo’s, which is really a welcome addition to Photogene. In testing the app, I played around by applying about thirty effects and changes to an image. Using the Undo button, I was able to undo all the way back to the original state of the image. Additionally, at any time in your editing or experimentation, you can tap on the Save button. Photogene actually treats this in a similar way as a “Save As†in that it will always save a new version of your photo containing the most recent edit. In any event, as long as you continue working on the same picture, you can still undo all the way back to the original state of the picture. This is great because it gives you yet another way to revert back to the original image and provide another chance to save it to the Photo Library in case you had neglected to do so previously. This, again, is all in the name of Pixel Preservation.
Finally, let’s take a look at the options that Photogene offers when finished with an image editing session – all accessible when you press a Checkmark button indicating that you are done editing. You are given several options: Save, Resize, e-Mail Photo, Copy to Clipboard, Take Photo, and Edit New Photo. I already covered the Save features previously.
With the Resize option, you are given the opportunity to save your original image to a variety of pixel dimensions. Assuming you are taking the photo with an iPhone 3GS, the resulting pixel dimensions (a.k.a. “resolutionâ€) are 1536×2048 pixels. (By the way, the resolution is 1200×1600 pixels on the original iPhone and iPhone 3G). With the 3GS you are given the option of resizing to the following “long-side†pixel dimensions: 329, 640, 1024, 1600, or 2048. Selecting e-Mail Photo transfers your photo from Photogene to a new e-mail message in the Mail app ready for you to address, add body text and send. The resolution of the photo will be the same as it was when open in Photogene. When you select the Copy to Clipboard command, your photo is copied to the clipboard in a reduced resolution of no larger than 640 x 480 pixels. Typically, you might do this to paste a picture into an MMS message.
The last two options – Take Photo and Edit New Photo – allow you to start a new editing session from either a photo captured by Photogene controlling the camera or from an existing image from the Photo Library.
In conclusion, as I indicated at the beginning of this review, Photogene is my app of choice for photo editing on-the-go. In particular, Photogene successfully addresses my need for full tonality editing via the histogram and the Levels Tool – a vital professional tool that is not commonly available. Levels lets me make all my desired exposure and contrast tweaks, as well as color corrections and color channel edits. The other valuable tool that Photogene provides is the free-rotate tool with its visual guides for easy image straightening. Along the same lines, I really like that I can custom crop with pixel dimension changes indicated in real-time, as well as providing a number of crop presets. Personally, I could do without the special effects in Photogene; they look like an afterthought. If I want to apply artistic effects to an image, I will use one of several other fine apps that specialize in this functionality. Similarly, for frames and border effects, I generally find them to be frivolous. However, I do use some on occasion, and Photogene provides a very nice mix of customizable frames and borders.
Pixel Preservation is handled well by Photogene. Throughout your editing workflow you can make multiple saves to your Photo Library. The only wish-list item I have is to allow for the immediate saving of an image when you have Photogene take the photo via the iPhone camera. Finally, the app’s support for multiple undos makes experimenting in the image editor a valuable learning experience.
The developer, Omer Shoor, has a very helpful support website full of tips, frequently asked questions, tutorials, and a gallery of example images. Visit the site at www.i-photogene.com/
Update! – The best iPhone photo editing app just got better!
As my review of Photogene 2.1 was on hold for publishing to MyMac.com, a brand-new version 2.5 became available on the iTunes App Store on December 22. Here’s what’s new with the latest version: 1. You can now upload your photos to a “Hall of Fame†viewable directly from within the app. (It’s unclear if this is accessible via a browser); 2) There are new filters and effects – blur, posterize and black & white. 3) You can now upload your edited image to your Twitter and Facebook accounts. Finally, I’ve noticed some interface updates that make the app even easier and more intuitive to use.
MyMac.com Review Rating: 9 out of 10. An excellent rating to an excellent and crucial photo editing tool for the serious iPhone photographer! And, a real bargain at $2.99!
Requirements: Compatible with iPhone and iPod Touch, Requires iPhone OS 2.1.0 or later (tested on iPhone OS 3.1.2)
Version Reviewed: 2.1 (August 16, 2009)
email – MyMac Magazine – Twitter – Advertise – Reviews Archive – Podcast

Leave a Reply
You must be logged in to post a comment.