This week I’m going to give you a few tips for using iTunes. Just like my normal Quick Tips, these are short tips that are too short for their own article, but still useful.
1. Setting the drive you want to burn a CD to:
Before I had a computer with a CD burner built in, I had an external 52x burner. When I burn a CD I prefer to use the external, since it is more than twice as fast as the internal burner. iTunes will use the internal burner by default, so you have to tell it to use the external drive.
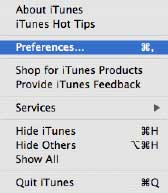
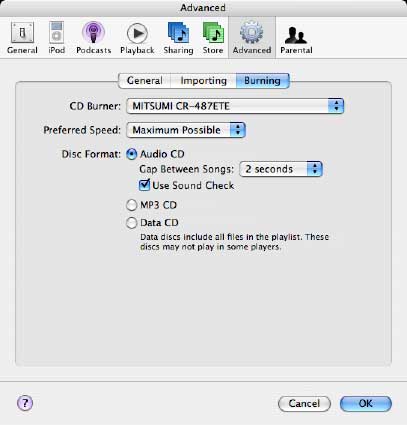
To do this, go to the iTunes menu and choose “Preferences.†On the top of the windows click “Advanced.†From here, click “Burning.†On this window there will be a pull down menu to choose the burner you want to use. The name of the drives listed is usually the brand that makes the drive itself, not the company that makes it a nice external drive. For example, my Lacie drive is listed as a Mitsumi. If you aren’t sure which is which, the internal drive will be the one listed twice.

2. Set Parental Controls
For those parents out there who don’t want your children downloading explicit music, podcasts, or videos, this tip is for you. You can restrict this content in the “Parental†tab of the iTunes Preferences.
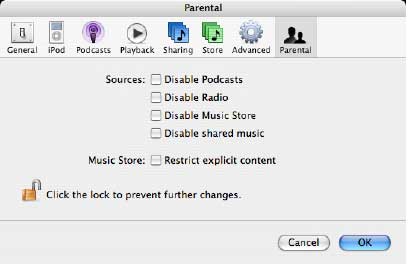
Here you can disable podcasts, radio, the Music Store itself, and shared music. Just want to keep out the explicit stuff? Check restrict explicit content.
This next step is very important. Click the lock in the lower left. You will be asked for the administrators’ password. This will prevent this setting from being changed. Of course, if your child knows the administrative password, you might want to change it. If your child has full control of the computer and is the administrator, you might want to change that too or just make the changes and hope they aren’t noticed or found. Good Luck!
3. Use the iTunes Music Store Shopping Cart
When I browse the iTunes music store I like to use the shopping cart feature. With this turned on I can click “Buy†on a number of items in the store, and they get added to my cart before I have to buy them. I can then go back and review my choices and make sure I really want to buy those items. With the cart turned off, you have to buy and download the items you want as soon as you click buy.
To turn the cart on you need to be in the iTunes Preferences again. This time click the “Music Store†tab. At the top of the window are options for buying items immediately or using the shopping cart.
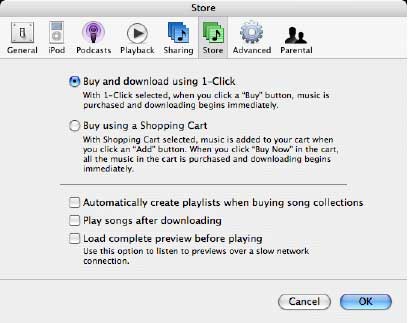
With the cart turned on a shopping cart will appear under the “Music Store†listing in your Source window of iTunes. When you want to buy or preview what is in the shopping cart, click the shopping cart. You’ll get a list of all the items in your cart. You can preview each item directly from your cart. To remove an item just click the “x†at the end of the item’s row. You’ll also get a list or recommended selections at the top window of your shopping cart.

4. More on the Music Store preference window.
You might have noticed a few more options in the Music Store preference window. These options can be very useful too.
The first options is great if you are buying an entire album and you want to burn a CD of that album. Checking “Automatically create playlists when buying song collections†will automatically create a burnable playlist of that album.
“Play songs after downloading†is pretty self-explanatory.
Finally, “Load complete preview before playing†is great for those with slower connections (as the description in iTunes states). With this option unchecked a preview might sound like a bad cell phone connection. You’ll hear bits and pieces as it loads, instead of all at once with the option checked. Yes, you’ll have to wait a little longer for the preview to play, but it is worth it.
5. Deauthorize your old computer
When you buy a new computer, and you are completely finished using the old one, make sure you deauthorize the old computer before getting rid of it. Authorizing a computer allows it to play content purchased through iTunes, and you can have no more than five computers authorized under your account. By deauthorizing the old computer, you’ll free up one of these authorizations.
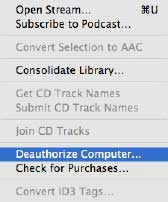
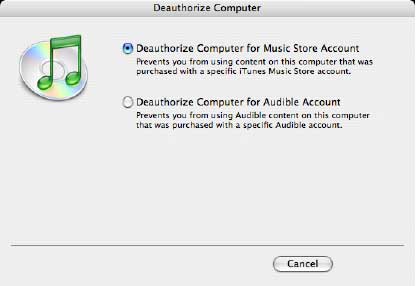
To deauthorize a computer go to the “Advanced†menu and choose “Deauthorize Computer.†You’ll be presented with a window asking you if you want this action for the iTunes Music Store, or for an Audible account. If you have an account for both, you’ll have to do this twice. The next screen will ask for your password. After that your computer is deauthorized.
Your new computer will ask you to authorize it the first time you play a purchased item from the iTunes Music Store.
6. Check for Purchased Music
Under the “Deauthorize Computer†option is one that says “Check for Purchased Music.†If you ever have problems downloading a purchase from the iTunes Music Store, this is the place to start. Choosing this option will look for items you purchased and make sure they are in your Library. If it doesn’t see something, it will start downloading it.
This option will not always “save the day,†but it is a good place to start before panicking or contacting Apple.
That will do it for now. Have any iTunes tips of your own? Leave them below, or send me an email. I love getting feedback.

Leave a Reply
You must be logged in to post a comment.