
Last week I discussed how to do a basic installation of OSX. This week I will discuss different options you can choose (or may have to choose) during the installation process. Some of these options will save you hard drive space, and also shorten the installation time. Once again, the screen shots are from a 10.3 install, and may vary slightly for other versions of OSX.
I’ll start from the point where you are prompted to choose the drive that you would like to install OSX onto. Hopefully, you see the green arrow I mentioned last week, which means you can proceed. For instructions prior to this step see Macspiration #32.
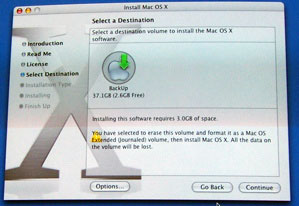
If you get the yellow yield shaped sign, you are being warned before proceeding.
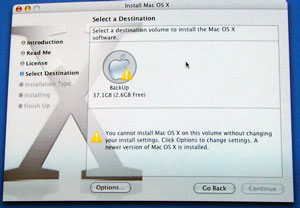
In this case, I was reinstalling OSX from a CD that contained an older version of OSX than what was installed on the computer. I was being asked if I wanted to proceed. I had to pick one of the install options from the menu shown below in order to continue. To get to this menu, click the options button in the lower left of this window.
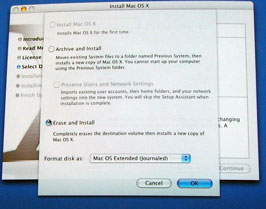
Even if you don’t get a yield sign, you still might want to click options and choose the type of install you want to do. Depending on your situation, some of the options described below might be faded out and not a choice.
If you are installing OSX for the first time, you will probably want to choose the first option, “Install Mac OSX.†This will keep OS9 and the Classic operating system in tact for running a lot of older software that only works in OS9. Of course, if you are on an Intel machine there is no Classic environment or OS9 support. If you do not want OS9 on your computer, or Classic, you might want to go with the third option “Erase and Install.†Skip ahead for more on this option.
There might be an “Upgrade and Install†option, even though it was not presented to me. This option is there for those going from 10.2 to 10.3, or 10.3 to 10.4, and so on. I’d avoid this option, and go with the “Archive and Install.†When I went from 10.2 to 10.3 I chose the upgrade option. As a result, I had some problems with Software Update running properly, and I had to go back and do an “Archive and Install.†Since then, I always choose “Archive and Install.â€
“Archive and Install†will replace your system and copy your old system folder into a folder marked “Previous System.†It will not erase any of your documents or installed applications. The advanced user can go into this folder and copy preference files and other files to the new install. I usually delete it after a couple of days, since the folder will take up a lot of valuable hard drive space. By choosing “Preserve User and Network Settings†your Internet settings and your user account will still be intact after the install.
Finally, “Erase and Install†does exactly as the name implies. It erases the hard drive, and everything on it, and installs OSX fresh- as if it just came from Apple. This is a good option if you want to get rid of OS9 and have everything you need backed up. Maybe you just want a clean start. If you are selling your computer, or giving it away, this is definitely the way to go.
Once you choose your option, click “OK†and continue onto the next screen. Here you can customize the installation further by clicking the “Customize†button.
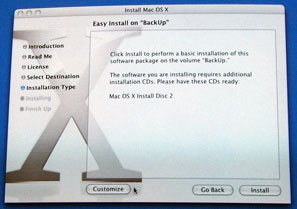
Clicking “Customize†will present you with a checklist where you can opt not to install certain parts of the full installation. Clicking the name of each item will present a description in the bottom portion of the window. This list may vary in the different OSX versions. Unchecking an item will free up disc space, and make the installation time shorter. Clicking the little arrow to the left of the item, will present a submenu of items.
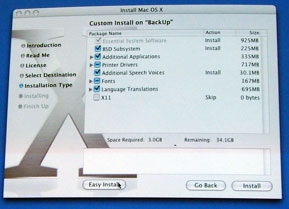
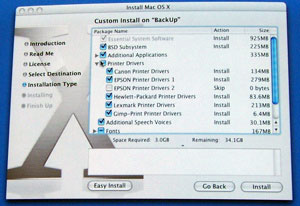
So, what should be checked and what should be unchecked? Here’s what I do:
1. Essential System Software- You have no choice here, this is a must (hence the “Essential.â€)
2. BSD Subsystem- I’m not exactly sure what this is, but I once installed OSX without it and regretted it. Some software needs this, so I always install it.
3. Additional Applications- Here you might find iLife apps (depending on the CD), and other foreign language files. The iLife applications are up to you, based on your needs. I always uncheck the foreign language files. I have no need for them.
4. Printer Drivers: This will show you a list of printer drivers to be installed. To save drive space you can leave this unchecked and install the drivers from the CD that came with your printer. Another option is to only check the brand of your printer. Keep in mind that your printer may not be installed, even if you choose the correct brand. Some printers will be too new, or others might not have developed OSX drivers until after the install CD was made.
5 and 6. Fonts and Language translations: Again, foreign language files that I don’t need. I uncheck them. If you need other languages, choose the options you need.
7. X11- This is needed for some software like Open Office (a free Office clone). I leave it checked on my own installs, unless I can’t spare the drive space.
Once your options are chosen, click install, and the process will begin and follow the process I outlined last week for finishing the installation.
If you followed the suggestions above for customizing the installation you probably saved a lot of drive space. Next week, I’ll tell you about a program that has the possibility of freeing up an additional 1gb of hard drive space or more.
Until then, leave your questions and comment below.

Leave a Reply
You must be logged in to post a comment.