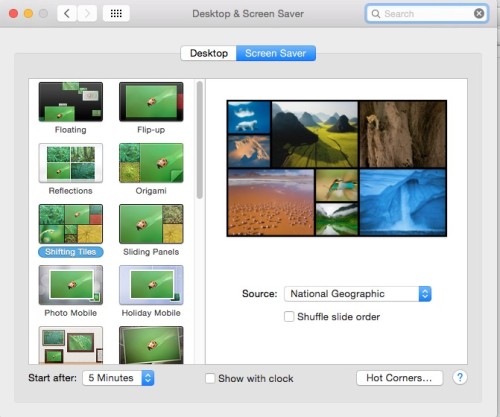
Here’s an old favorite. How to set a screen saver on your Mac.
To set a screen saver start by clicking the Apple in the top left of the screen (the Apple Menu). Choose System Preferences. From the window that opens click “Desktop & Screen Saver.”
Next click the tab labeled “Screen Saver.†The other tab is for setting a desktop picture. I’ll get to that another day.
In the “Screen Saver†tab you can choose the style of your screen saver. On the right there is a “Source†menu. Here you choose where the screen savers are coming from.
You can choose from several built-in sources or you can choose pictures from your photo library. Currently, Photos, iPhoto, and Aperture libraries are all supported. You can also have a folder of photos on your computer and choose that folder as a source.
On the bottom of the screen you set how quickly the screen saver should start running after a certain period of inactivity. You can also choose if the clock should appear on the screen saver. Finally, you can set hot corners.
If you set a hot corner the screen savers will start whenever you put the mouse pointer into that corner. I don’t like hot corners. I always find myself accidentally setting them off. However, temporarily turning them on is a good way to test the screen saver you have chosen.
Once you make all of your selections click the red button in the top left of the window to get out of System Preferences and you are good to go.
Have a topic you want covered? Leave a comment below.


Leave a Reply
You must be logged in to post a comment.