Data Doubler for Mac Mini with 240GB SSD and Tool Kit
Company: OWC
Price: $225.00 USD
Just a year ago, I replaced the hard drive in my new MacBook Pro with a 256GB SSD. The difference in speed and performance just blew me away. So as I continued to use my 2011 Mac Mini with its original 500GB hard drive, everything just seemed to get slower and slower until I couldn’t take it anymore. I did my research and decided I was going to order a DIY Data Doubler kit with a 240GB SSD and tool kit from OWC.
My 2011 Mac Mini is the basic 2.3 GHz model with the Intel Core i5 that I had upgraded the RAM to 8 GB as soon as I had opened up the box and went to set up the Mini. Yes, I had upgraded to Mavericks when it came out after reviewing what I had on my hard drive, removing what I didn’t need and ran Disk Utility to verify all was well. The one thing that I did want to see was how fast my Mini was running so I ran the Quickbench hard disk performance test with really slow speed results. When the hard drive is showing sequential reads of about 37.000 MB/sec and sequential writes of about 28.778 NB/Sec over 10 cycles, you know that things are slow. Having run the test several times, I was not very impressed at all, especially when compared to how my MacBook Pro was running.
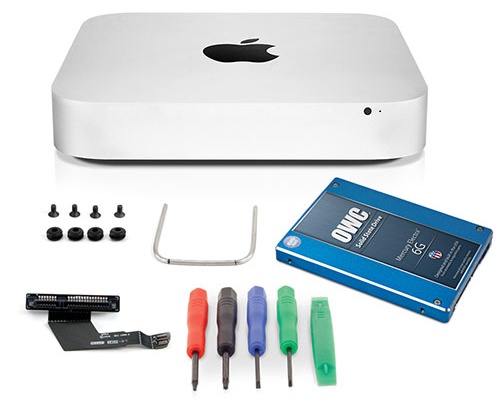
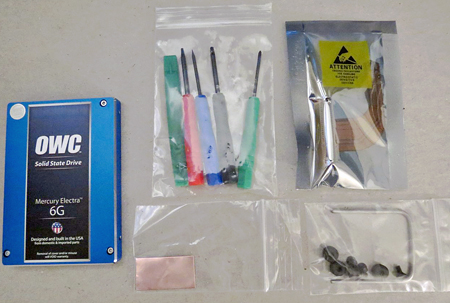
Now I had viewed the installation video that OWC has on their website for installing the SSD as a second drive into a 2011 Mac Mini and although the task was rated as “Challenging†I knew that I could handle it based on my background. Time to complete the task, 45 minutes. I placed my order and began to prepare my work area, cleaning off the desk area to make sure I had all the room I would need. When my package arrived, I checked to make sure that everything was there: 240GB Mercury Electra 6G SSD, the tool kit consisting of a Phillips #00 screw driver, a Torx T6 screw driver, a Torx T8 screw driver, a straight blade 1.8mm screw driver, a nylon pry tool (better known as a Spudger), the flex cable to connect the new SSD to the logic board, the logic board removal tool and 4 rubber grommets and 4 hex screws to secure the SSD to the drive caddy. OWC also includes a small piece of foil shielding to help reduce the Bluetooth interference in the 2012 Mac Mini models, along with the instructions on what to do. There is also an installation manual to make sure that things will be easy to follow as you dive into your Mac Mini.
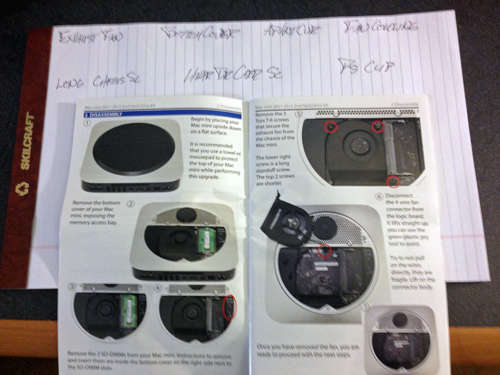
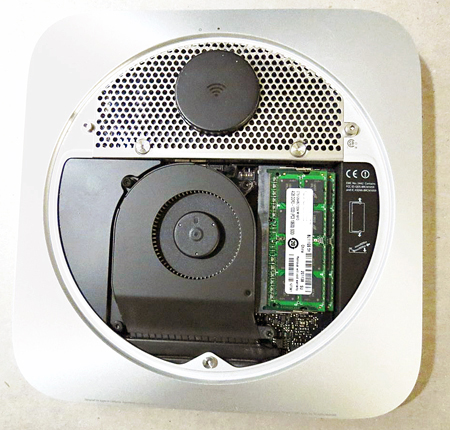
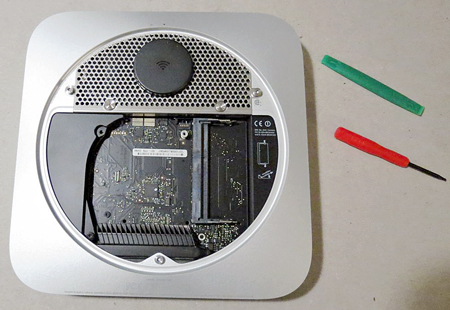
I made sure I did multiple backups of the existing hard drive and when I was finally ready to go, shut down and disconnected the Mini. To make sure that I didn’t misplace screws or anything, I used a sheet of legal sized paper and wrote down the specific areas that I would be removing screws from so I could place them there and not mix things up. The copy of the instruction manual that’s included with the kit was also placed in a prominent spot for quick reference as things progressed. Making sure that I had grounded myself, I began to disassemble the Mini. After removing the bottom cover, the first thing to be removed is the RAM. Quick and easy to do.
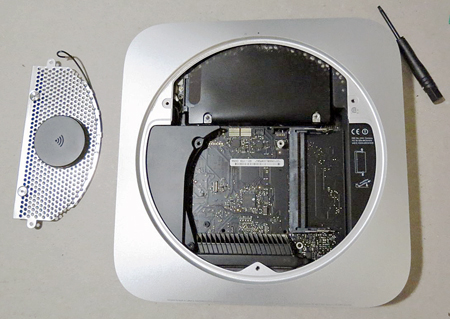
The first piece of equipment that comes off after that is the exhaust fan, held in place by three Torx screws. The first thing that causes pause is you now have to disconnect the 4-wire fan connector that is smaller in size than your nail on your pinky. Using the pry tool, I slowly pulled the connector straight up and placed the fan off to the side. Next is the removal of the bottom cover of the Mini. Five screws are removed and then you have to gently lift up the Airport antenna, disconnect the wire leading to the Airport card and once done, place it off to the side too.
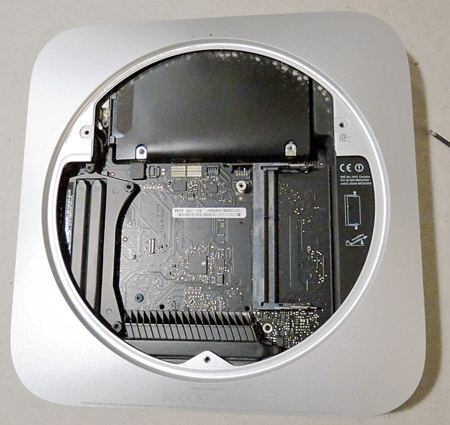
Surprisingly, this didn’t turn out to be difficult at all even though the connecting wire is thin and the point of connection is in a small access area. Then the next item to come off is the fan cowling. Now the really fine detail work begins. Using the pry tool, the hard drive connector is pried up, followed by the IR board cable; again, a really small connector that needs to be gently pried up. As long as you don’t become clumsy or exert too much force, it is doable. One long screw has to be removed that holds the logic board to the top of the Mini case and now the fun begins. Take a deep breath as you now have to use the logic board removal tool to begin the removal of the board.
I followed the instructions that came on both the video and in the instruction manual; inserting the logic board removal tool into the two holes in the logic board, made sure that the tool was all the way down and slowly began to push down and pull back on the tool to begin to move the logic board slightly as there is still one more connection, the power supply plug, that needs to be disconnected. However, the logic board decided it was very happy exactly where it was and really didn’t want to go anywhere. So there I am, trying to apply pressure without causing the logic board to pop out suddenly and mess everything up. No matter what I did, the logic board just would not budge. I’m sitting there wondering how I’m going to get this logic board out without ripping the power connector totally off? All of these miniature connectors have very thin wires leading into them and one becomes afraid that too much pressure will cause the wires to break. After sitting there for about 10 minutes trying to be very patient and getting the logic board to move, I decided that a little bit of further action was needed. It all seemed so simple when I sat there and watched the video of how to do the installation. Using the straight edge screwdriver that came with the OWC toolkit, I began to gently pry at the rear of the Mac mini where the logic board meets the case. Being really careful I worked my way around the edges of the logic board and the Mini case. I finally got to the point that logic board began to move slightly. Watching what I was doing I soon found out that on the left and right sides of the logic board there is a clip, if you want to call it that, that is basically holding that logic board against the case. Using my fore fingers I put a little bit of pressure against those clips and the logic board began to move smoothly out of the case.
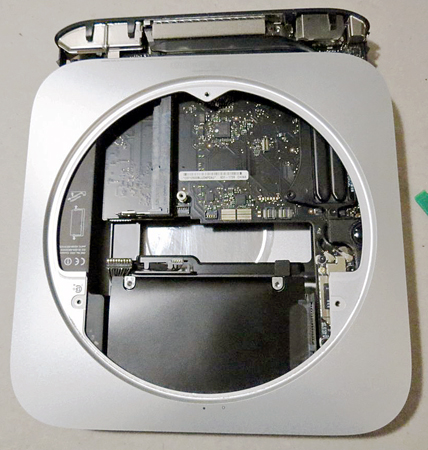
Having moved the logic board out about a quarter of an inch, it was now time to disconnect the power supply plug from the logic board. Again using the pry tool and being very careful I disconnected the power supply plug from the board. The board slides out smoothly with no problems once that is done and the next step is to remove the two Torx screws that hold the hard drive carrier and power supply in the chassis.
At this point, it’s time to remove the original hard drive from the carrier. Once that is done on the right side of the case is a metal tab that holds the power connector in place. You’re simply remove the tab, rotate the power plug 90° counterclockwise and pull the power supply out of the Mini chassis. Be really careful with that clip that holds the power connector in place as it bends and distorts very easily.
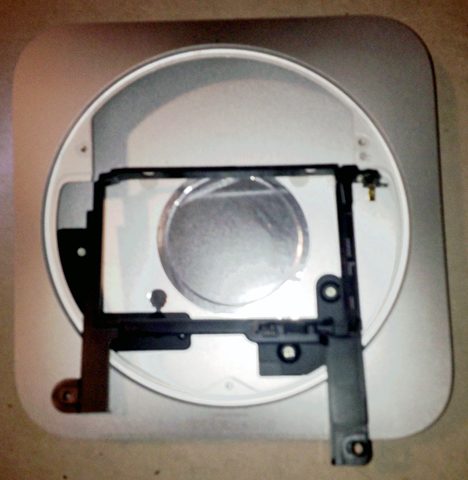
Once I got the power supply and the hard drive out, the next step was to remove the hard drive carrier and get ready to add the SSD to the carrier. Part of the do-it-yourself kit includes four rubber grommets and four screws. The grommets are inserted into the holes that are already present in the carrier. Now it was time to add the SSD to the carrier. I took the flex cable that came as part of the package and inserted it onto the SATA port on the SSD. Making sure I didn’t bend the cable the wrong way, I positioned the SSD into the carrier and then, using the four screws, secured it so that it wouldn’t move. Now the process is reversed and you begin to add everything back into the Mac Mini.
The hard drive carrier goes in first followed by the power supply. Once everything is in place, you now rotate the power plug clockwise 90° and reattach the clip to hold the plug in place. Realistically I’ve seen cheap paperclips that are stronger than this clip. Once the carrier and power supply or secured by the two screws the logic board now gets reinserted into the chassis. Pushing it back until it’s about a quarter of an inch away from the hard drives, the power supply plug was connected back to the logic board. The logic board is pushed all the way in and the hard drive that came with the Mac Mini was now placed back into the carrier with the SSD below it. Of course, as the instructions tell you, make sure that the hard drive is seated properly so that the two screws on the back side fit back to the location where it was located. Easier said then done but I got it where it needed to be. I continued to follow the instructions, lining up the SATA connectors and connected them to the logic board. I also reconnected the IR board cable. The reinstall of all the other items went smoothly and no problems were encountered. Once everything was back inside, I reinstalled the RAM, placed the bottom cover on the Mac Mini and reconnected the Mac Mini to all the peripherals.
Started up the Mac Mini and the original hard drive came on as the only drive with an operating system. Using disk utility, I partitioned the SSD with one partition, set is as a GUID, set the format and once that was done used an external USB flash drive that I had the Mavericks installer on and installed OS 10.9. The installation went smoothly, I verified that there was a recovery disk and then proceeded to use migration assistant to transfer over my existing apps documents and everything else. This is when everything began to fall apart.
Migration assistant was transferring everything over, got to the point that there was less than one minute remaining, and stopped. It just would not finish the installation. I let Migration Assistant run for over an hour and a half and there was no visible activity present. Figuring that this was not normal, not ever having this problem occur before, I decided to retry the installation. I checked the two drives again, verified that there were no problems and erased the SSD and reinstalled Mavericks. This time I decided to use Carbon Copy Cloner and clone from an existing external hard drive. The cloning process began and after a while suddenly ended. What began to occur was that the SSD was unmounting itself after a few minutes or after an hour. There was no rhyme or reason to what was occurring. I verified that the firmware version was the correct one, ran Disk Utility and of course, the disk unmounted itself.
I thought that maybe the cable from the SSD to the logic board may be loose or had become disconnected so I shut the Mini down and began the tear down again. I only removed the fan so I could see where the cables connected and both were seated properly. The fan went back in, restarted and the SSD mounted properly. Within a half hour, it again unmounted itself. This continued to happen no matter what I did. At this point I contacted the OWC tech line and advised what was occurring. Customer service with OWC was great. Arrangements were made to ship me another  kit (240GB SSD and cable) , and a RMA pre-paid label was sent via email to me for returning the original cable and SSD. I had the new kit in a couple of days and since I had not removed or erased the original hard drive, I was still able to continue using my Mini.
The package arrived with the new SSD and cable and since I had backed up the hard drive prior to its arrival, multiple times to be sure, I shut down the Mini and tore it back down to where I could remove the hard drive carrier, take out the original SSD and  cable, and install the new ones. This time everything went a lot smoother in regards to opening up the Mini, getting everything out and back in safely. When I used the logic board removal tool this time, there was no problem in moving the logic board out. OWC shows the estimated time to complete the installation at 45 minutes. The original installation took me about an hour and 45 minutes but this was primarily due to the issues that arose in attempting to move the logic board out. This time the installation took me an hour, again with me erring on the side of being careful.
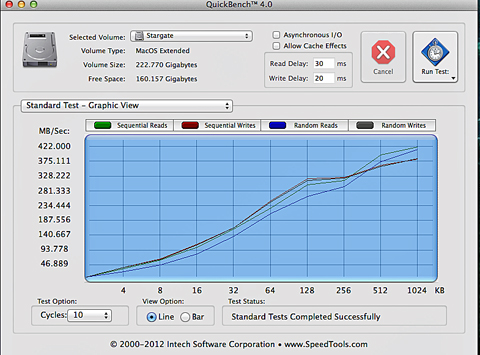
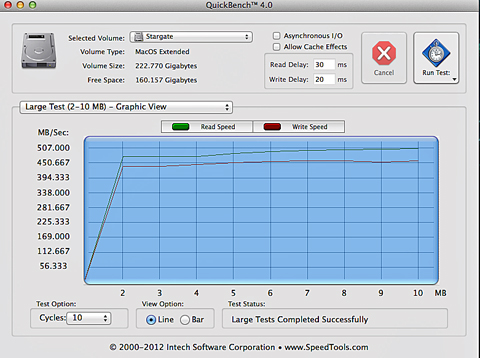
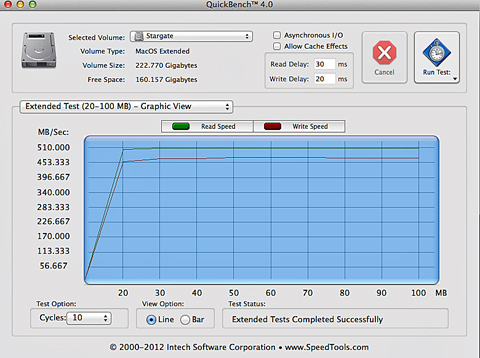
The installation of Mavericks on the new SSD went smoothly, no issues at all as before. This time Migration Assistant worked flawlessly, no issues at all. As I was a bit close to the storage limit of the SSD, I backed up every day to external hard drives as I did not want to erase the original hard drive until I was sure that things were working smoothly and there were no surprises in store for me. After a week and a half, as things were working great, I finally erased the 500GB hard drive. I had previously decided that I didn’t want to do a Fusion Drive but what I did do was what I had done with my MacBook Pro which was to erase the original hard drive, drag the Home Folder over to it and then set the new location up using System Preferences under Users and Groups. So the current system on my Mini is the 240GB SSD as the location of the OS and all applications plus a couple of other folders. On the original hard drive has my Home Folder with all my music, photos, downloads and documents. Things have really changed since I added the SSD to the mix. As you can see below, I ran the Quickbench tests again, looking to see what happened. What a definite increase in reading and writing to the disk, and if nothing else, it is very evident when you sit in front of the computer and work on something. Copying items is definitely faster, apps open faster and the overall experience is most definitely improved and well worth the time, effort and the price. I’ve included the results after running all three Quickbench tests (standard, large and extended) for 10 cycles and as you can see below, the results are just great. What a difference the SSD makes when it’s added to the Mac Mini.
You can take an older Mac Mini, update the unit with a faster SSD, keep your original hard drive or update that also and do it all without having to spend another $600 plus for a new Mini. With the improvements that I’ve made, including RAM and the SSD, I expect to get a few more years of good use out of the Mini. For those of you who don’t mind getting your hands “dirty†working on your Mac, have the skill and will to make changes, I would highly recommend that you consider the option of getting a Data Doubler kit and update your Mac yourself. Also, there is a one-year warranty on the tool kit and the OWC Mercury Electra 6G SSD comes with a three-year warranty.
Recommendations to make things a little bit easier on yourself when doing close up delicate work on your Mac:
* Spend a few dollars and purchase yourself a LED headband light- despite having two lamps on and natural light I found the LED headband invaluable.
* Get yourself a hand held magnifying glass for the delicate work-as I said in my review some of the connectors are very small and delicate.
* If you can find an inexpensive pair of the magnifying lenses to fit over your regular glasses, if you wear glasses, or the lenses in eye glass frames to improve your close up vision, consider purchasing.
* Above all, take your time! Don’t rush to get things out or to put them back in!
* Check which year your Mac Mini is and read the instructions on installation as some of the 2012 Mac Mini units (and some 2011 models) shipped with the drive mounted in the upper drive position rather than the typical lower position in the vast majority of the units. If you follow the instructions on how to locate where your drive is located, and discover that it is in the upper position, you will need additional components to install the new drive.
Just to update you all further, I did follow up with OWC regarding exactly what the issue was that caused me so much grief on transferring my data over to the SSD and what caused the SSD to unmount itself. It turns out the issue was the cable and not the SSD. I just happened to get a cable that failed to do what it was supposed to do.
All in all, based upon my use and its capabilities, and even with the difficulty I encountered, I give the OWC DIY Data Doubler with 240GB SSD and Tool kit a MyMac rating of 9 out of a possible 10.



Leave a Reply
You must be logged in to post a comment.