Adobe Photoshop Lightroom 5
Price: $149 US, upgrade $79 US
Company: Adobe
Adobe just released the new version of its photo management and editing software, Adobe Photoshop Lightroom 5. The software comes with many improvements to help photographers in their work. In this review we will explore them so you can judge if the upgrade is worth it.
Smart Preview
Many photographers, amateurs or professionals, use laptops as their main computer. Because those computers often have limited hard drive or SSD space, they put their master files onto an external hard drive that stays home when they travel. When on the road without the master files available, users of previous versions of Lightroom could not make any adjustments to their image files.
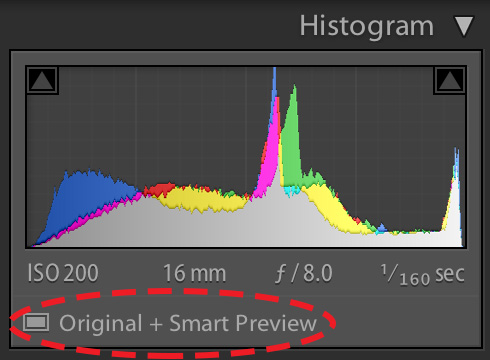
With the new Smart Preview feature, this limitation is now a thing of the past. A Smart Preview is a compressed DNG file of your master file, that contains enough information for the user to make adjustments on the road. When back home, the adjustments done when traveling will be transferred to the master files once they are reconnected.
You can create Smart Previews of your files at import by checking the related checkbox in the Import dialog. For existing images, the user can create Smart Previews in the Library module by going to the Library menu, Previews/Build Smart Previews. In my testing, I figured out that a compressed DNG is about one third of the full size DNG file. This is nice for traveling, especially due to the fact that you don’t have to have all your images in Smart Preview form, only those you plan to work on.
Smart Preview has its limitations. For example, when the master files are not online, you cannot go to an external editor like Adobe Photoshop to make an edit. It makes lots of sense since the compressed DNG may not have enough quality for that kind of edit.
But a strange behavior is that you cannot email an image directly from Lightroom via the File/Email Photo… menu item. Lightroom will alert you with a message that some photos are missing: it means the master files are not present. But if you go to File/Export… and chose For Email (Hard Drive) option, and place them on your hard drive, you can email the resulting file(s) from your hard drive. If you want larger images, you can use the Burn Full Size JPEG in the Export… window. Considering that I can export relatively large images from the Smart Preview and manually mail them, I hope it is something Adobe will patch in a next release of the software.
More editing features for photographers
Lightroom is software designed with photographers in mind. In that respect, editing and presentation tools are very important, and Adobe added a set of nice new features.
My favorite addition to this version of Lightroom is the new full screen mode. When you press the letter F, Lightroom will display your images full screen, with no distractions, no menu, no buttons, no nothing. Hidden in this mode is the fact that all shortcuts to manage your library are working: you can pick, reject or unflag (P, X, or U), rate your images (0-5) and so forth. Everything that has a shortcut in the Library menus that I’ve tried is available. That is the perfect way to review a new photo shoot you just imported. On a MacBook Pro with retina display, the full screen images are sensational.
The Advanced Healing Brush is a new feature under the Spot Removal tool. When you select the tool, the Heal option now permits you to draw over the selection you want to repair. In the previous versions of Lightroom you could only select a circle shape, and an image problem is rarely a perfect circle. Take the following example of a picture I took where I found the black tile on the floor in the original picture to be distracting.
With the Advanced Healing Brush it was a piece of cake to remove. Previously I would have had to round trip to Photoshop for that same kind of edit, or do multiple circle heals, which sometimes resulted in “dirty areas” in the picture. The tool is still not perfect as it only patches from an adjacent part of the image, which may leave the picture with visible spots that it was edited; it all depends on what you’re trying to fix. I’d have really appreciated if Adobe would have incorporated some of the Content-Aware technology they already have in Photoshop.
There is also a new Visualize Spots checkbox with the same tool that can be found in the tool option bar just under your image. If you check it, it may help you find spots that were on your sensor or lens. Essentially the tool puts your image into a kind of X-ray view where spots are easier to visualize. It will work well if you have an image with, say, a clear blue sky where you have spots. But with a busy picture, it may not really help you at all. It is still nice to see some new tools to help us in creating good photos.
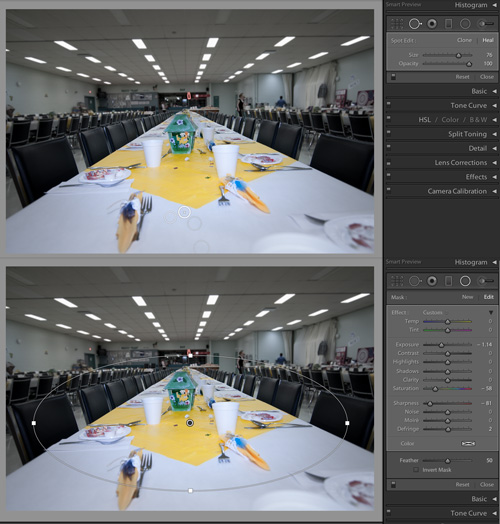
Another new addition in Lightroom 5 tools is the Radial Filter. The tool permits you to draw an elliptical shape around a subject or any other objects you want to work on. By default, the tool excludes the circled area from the retouching adjustments. If you wish to adjust the circled area itself, you can click the Invert Mask checkbox before doing your adjustments. You can add as many Radial Filters as you want, such as a normal one and an Invert Mask one, and really put your subject in the foreground without going to the full Photoshop.
In the following picture, I used the Radial Filter tool to emphasis the table setup (the subject) and reduce the ceiling lights and the surroundings by lowering the Saturation, Sharpness and Exposure sliders.
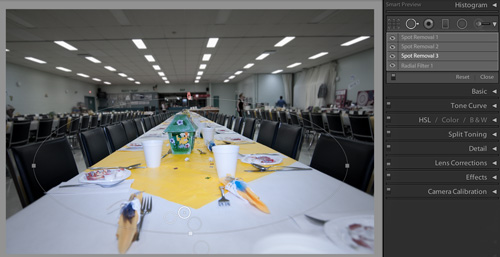
With more functionalities in the Lightroom tool strip, I would appreciate if Adobe had added a more visual way of seeing which tools were applied to a picture. There is no way to see all the edits made with all tools at once; your only way is to click each tool one by one so you can figure out what you did. This next screen shots show you further editing I did with the same image using the Radial Filter and the Advanced Healing Brush.
I hope that in a future version Adobe will offer us some kind of visual way to see all used tools at once. I am thinking of a simple disclosure triangle to the right of the tool strip that would list all changes like a Photoshop layered document. Just to illustrate my concept, I did a mock up of what it could look like below.
The last major improvement Adobe added to Lightroom is the Upright Tool. This one can be found under the Lens Correction Adjustment Panel. It has five modes that you can use: Off, Auto, Level, Vertical, and Full. In most of my tests I figured out that the Auto mode is the one to try first and if you see it does not do a good job, try the other one afterward. The Full mode is the one I used the least because it tends to stretch the picture in a way that may need cropping, and some objects may look weird (either too long, or too flat). Look below at a before and after sample using the Auto mode on my shot to have an idea of the tool strength. You can also use the new Aspect Slider found in the Manual tab to refine the Upright Tool adjustment manually.
In addition to those new editing tools, Adobe also added more options to share your work. The Slideshow module can now include video and you can add music to your slideshow as well. I still believe that the Slideshow module could be better than what it is now. If you’re on a Mac and have iPhoto installed, exporting your images in JPG once edited in iPhoto and create a slideshow with it will give you more interesting results.
In the Book module you can now easily customize the provided page layouts and save them for future use with the Save as Custom Page in the contextual menu (right-click). When Lightroom 4 Book module was introduced, that was probably one of the first requested feature I saw on the Internet from users. You can also add page numbers to your book.
In the world of Creative Cloud that Adobe is taking forward with its new CC Creative Suite, I’m disappointed to see that the Web module did not have any improvement. It stayed the same as it was in previous versions. I hope this module will see some upgrade in the next iteration.
Conclusion
This new version 5 of Adobe Photoshop Lightroom is packed with features that are great for photographers. I especially like the new full screen mode and the Smart Previews. The pricing is the same as it was for version 4, and it is also available in the Creative Cloud if you are a member of the full package.
If you have a previous version of Lightroom, the upgrade is certainly well priced and offers you a great set of new features. If you are using a portable computer with your master files on an external hard drive, the Smart Previews will save your life more than once. As an example, I wrote my full review with my master offline, something I would not have been able to do in previous versions. If you do not have Lightroom yet, there is a free 30 day trial available on Adobe’s web site, but be prepared to use your credit card soon after!
MyMac Review Rating: 8 out of 10
Â

