Nemo’s Ten Point Tutorial Number 12
Photoshop CS5 Workflow for Beginners — #2 — Color zinger in grayscale photo
Use and learn a new set of Photoshop CS5 tools and techniques in this lesson. Set aside an hour to complete it, and you’ll have time left over to tell your friends how easy and exciting it is.
Often an outdoor sunny day color subject has way too much contrast for you to attempt to get the lighting balanced. Don’t bother trying. Convert your photo to grayscale (black and white), because our eyes are much more forgiving of heavy contrast in grayscale pictures.
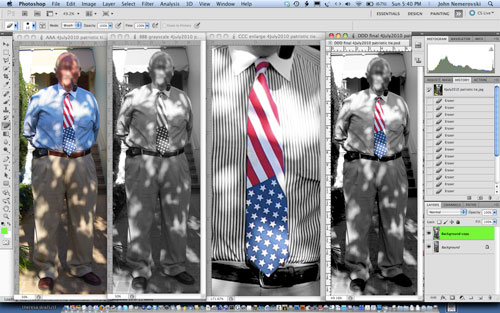
I blurred the face of this subject to protect his privacy. He was nice to agree to have his snapshot taken this morning as I passed his house.
Here is the workflow to convert from color to grayscale, and then to bring back the color in his tie. These steps are primarily for beginners new to professional Photoshop CS5, or people familiar with Photoshop Elements. If the workflow is too streamlined, let me know. My goal is to make all our MyMac Ten Point Tutorials as easy as possible, without extra steps. Experienced Photoshop users will have more refined workflows, but their images may not be superior at the end of the process.
1. After importing your camera JPGs into iPhoto (ask me if you don’t yet know how to do this), click-hold-drag an original iPhoto picture over the PS icon in your Dock to (wait ten to twenty seconds) launch Photoshop CS5 with your photo displayed in the workspace.
2. In the upper right of your Photoshop CS5 screen click on the double >> workspace selector and chose Photography. We will learn more about workspaces in future tutorials. Make sure your History palette is open: Window / History. I docked my History palette into the middle right Adjustments/Masks palette, but you can place yours anywhere you like.
3. Choose: File / Save As, then give your working image a new name, such as: Patriotic Tie 2010. For Where, choose Desktop, so you can find this photo later. For Format, choose JPG, then SAVE, and click OK in the JPEG Options window after making sure the quality is 12, which is the maximum. Choose: View / Fit on Screen.
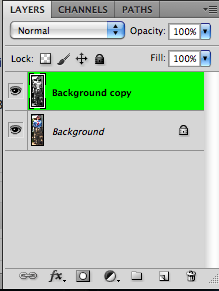
4. Choose: Layer / Duplicate Layer / OK. Observe the new layer in your Layers palette, to the right of your image.
5. Choose: Image / Adjustments / Black and White. Click Auto, then click OK.
6. Choose: Image / Adjustments / Exposure. Slide the three different sliders to the left or right until your grayscale photo is bold, but not overly contrasty. Your numbers will be different each time, image to image. Then click OK.
7. Press the Z key on your keyboard to activate your Zoom tool. Uncheck Scrubby Zoom. Make sure the little magnifying glass far upper left under BR has the plus sign chosen. Drag diagonally across the part of your grayscale photo you want to bring back to color, then let go of your mouse to see that small section magnified. (This takes practice! Choose: View / Fit on Screen to bring a zoomed portion back to full size.)
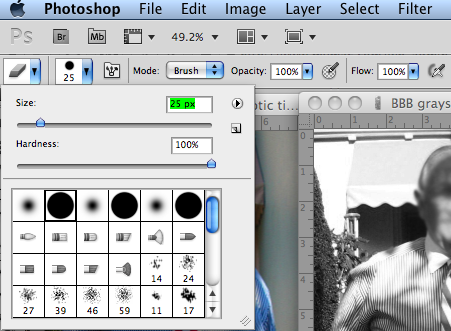
8. Press the E key on your keyboard to activate the Eraser tool. Click and hold on the little Eraser symbol in your Tools column to the left. Make sure you are using the Eraser, and not the Background or Magic Eraser. Stay away from those two for a while, beginners.
9. In your Options Bar above your image, make sure it is set to Mode = Brush, Opacity = 100%, and Flow = 100%. Then click and hold on the little number underneath BR, far upper left in your Options Bar, and slide Hardness to 100%. Use the [ left and right ] brackets to adjust the size of your Eraser’s circular outline over the part of your photo to be brought back to color. Carefully click and drag over that part, such as the tie in my photo, until it is fully in color. You will need to press those brackets again to change your eraser diameter, but you’ll figure that out by yourself soon enough. This also takes practice! Choose: Edit / Undo or Edit / Step Backward when necessary.
10. Choose File / Save. Your photo will automatically become as PSD, or Photoshop Document, instead of a JPG, because you added a layer, and layers are not compatible with JPGs. Insert a new word or phrase into the image’s name, such as: color added, or v2. Then click Save, and choose View / Fit on Screen. Congratulations. If you goofed, or these instructions are incomplete, let me know so I can get you back on track.
You can choose: Layer / Flatten to glue your layers together for printing and/or converting the final version to File / Save As / JPG. We will learn about these choices in a future Ten Point Tutorial.
Look on your Desktop for both your original and improved photos. In future tutorials we’ll discuss where and how to relocate all Photoshop images. For now, simply make a new folder on your Desktop: File / New Folder. Give this folder a name you will recognize, such as Photoshop Images.
By taking your time with this workflow you will become proficient with it, so be patient and keep your sense of humor. Every 20 to 25 minutes, get up from your chair and move around the room for five minutes.
Suggestions are welcome for additional beginner and intermediate tutorials for Adobe’s powerful new Photoshop CS5.


Hi, Great info, this worked great the first time. Tried to do it again and my eraser is not bringing the colour back. I must have changed a setting or something. Any ideas?