Portraiture Plug-in Version 2.3 for Apple Aperture
Company: Imagenomic
Price: $199.95
http://www.imagenomic.com/pt.aspx
Almost every picture of people you see in magazines or on the web has been retouched. If you are a portrait photographer, you may be tempted to retouch your photo so that the people look at their best. You can use software such as Photoshop or Aperture, with a brush and a few masks, to enhance the portrait. But that is a tedious and long task. A plug-in like Portraiture may come in handy to help you with the major portrait retouch. We have tested for you the Aperture version of the plug-in.
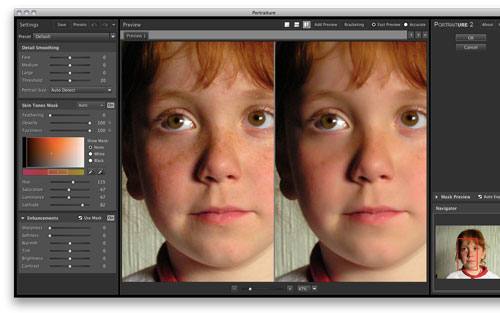
Portraiture is a plug-in that will retouch the face of your subject on a global scale. If what you want to do is to remove a few stains or wrinkles, you better do them in Aperture with the Retouch tool before you launch Portraiture. It is also preferable to do the general picture enhancement within Aperture, such as white balance or color correction, before you go to Portraiture. Then, when you’re ready to enhance your subject’s face, you can launch the plug-in by going to Photos/Edit with Plug-in/Portraiture Plug-In. Aperture will automatically create a new version of your file, and preserve your master as it is.
The huge dialog box will open with your picture in the center of it. On the left, you have all the adjustment sliders and presets, and on the right the Navigator and Mask Preview. On top of the picture frame, you can choose to see only the preview, or the before and after view. I personally prefer the latter with the pictures side by side. There is a zoom slider at the bottom of the window to let you zoom in. You can use the Navigator or the hand tool on the picture to change your view.

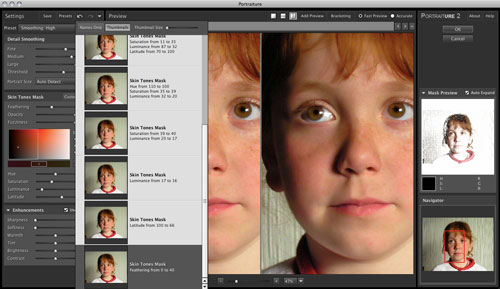
Portraiture comes with many presets that will help you smooth an image, or enhance it in some ways. From any presets, you can play with each slider to get the effect you want. Once you are satisfied with your settings, you can save presets for future use. All changes you apply while in the Portraiture Plug-In are cumulative and appear in a history list that you can view by Names Only or Thumbnails. All sliders that you move apply a change that appear in that history. If you are not satisfied with the result at one point, you can go back in the history and return to a state that looks better. Be aware that once you quit the plug-in, and return to it later for some changes, your history will be blank. There is no way from there to go back to a previous state other than create a new version from the master in Aperture.

Generally speaking, the plug-in works like expected. If you want to smooth the skin of a portrait to make the person look better, it is very efficient. One problem I found is that it can also affect some exposure zones of the picture you would prefer not to be touched by the effect. For example, when smoothing the skin of a model, it also smoothed the eyelash and eyebrow in some cases, especially when the hair color is similar to the skin color. It can also affect facial hair on males to a certain degree. I have not found a way to get around this limitation. A nice addition would be to have some kind of layer mask, like the ones found in Photoshop. This would help manually eliminate the parts you prefer not to be touched by an effect.
Fine tuning the sliders is optional and may depend on your subject or your personal taste. You can use them to enhance some specific problems of a subject, or to get a special photographic effect that reflects the type of work you do. In most cases, I played a bit with the sliders, but found that most of the changes are very subtle. In a way, that is fine, because in portrait photography, you normally don’t want to go over the top with your model’s face. The plug-in does a good job at letting the hair and parts of the picture that are not the face of your subject alone. For example, you do not have to think too much as to what will happen to the backdrop behind the model. I could have write a lot about each and every slider effect, but the results depends greatly on your needs and subjects.
If you are using Aperture as your main photo management application, and doing lots of portrait shooting, adding this plug-in to your tools is very welcome. There are a few things that may need to be perfected. For instance, you can use keystrokes to access some of the most common features, but the shortcuts are different from the ones found in Aperture. An example of this is the 100% zoom, which is done by pressing the Z key in Aperture, but obtained with the Command-Option-0 keys in Portraiture. This gives the results you want, but it is just a bit more confusing for the user. My main complaint remains the lack of a layer mask within the plug-in. Portraiture is also available for Lightroom, Photoshop CS5, and Photoshop Elements 8. The Photoshop version is the only one that offers the possibility to return the results via a new layer, on which you can apply a layer mask and recover from it.
The picture used for this article can be found at Morfile.com
MyMac Review Rating: 8 out of 10

Good review