Video Transfer
Company: Pinnacle
http://www.pinnacle.com/
Price: $99.99
I have an iPod Touch now, and I am constantly downloading apps from the Apple store. But I have a real problem when it comes to downloading TV shows and movies. Somehow, I just cannot pay again for the same TV or movies I can get on my Dish Network PVR, or DVDs, or old videotapes that are already paid for. But how do I get them from the source onto my iPod?
Typically this is often a complicated process involving a lot of time and money, usually done with some kind of capture card inside of a PC, or maybe an external device that captures and send the files to your computer’s hard disk. But then they are often not the right size or format, so you have to convert to the format you need, and maybe to the size for the device as well, and that all takes time and lots of effort. And there are hundreds of settings and options in every program that even a video engineer might not understand, meaning trial and error over and over to get it to look good.

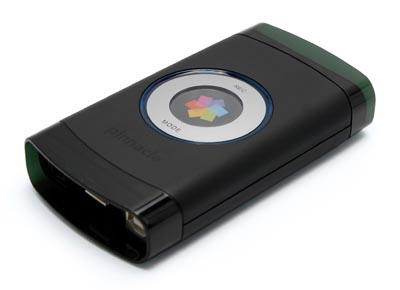
So this is where the Video Transfer unit from Pinnacle comes in. This compact little device (about 5†x 2.5†x .75â€) will let you convert videos from many different video sources and store them directly onto a USB device like a USB stick, an external USB Hard Drive, or an iPod, has only a few settings, and works without a computer.
Set up can be FAIRLY easy IF you have the necessary cables and destination device ready, but you may need a few extra cables that are not included, and be sure to keep and read the included instruction booklet, you will need it once you get started because not all output devices work here. So lets walk through set-up so you can see the issues.

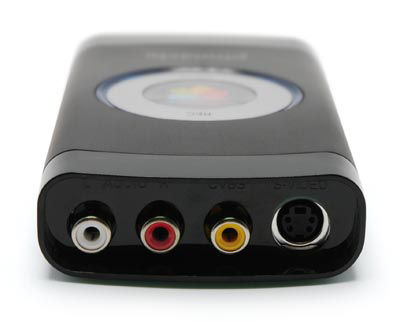
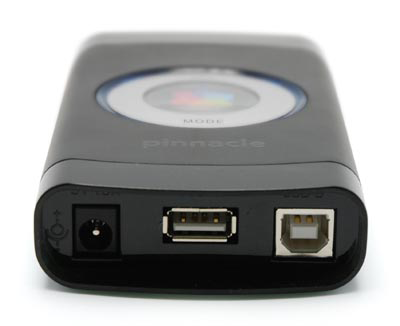
On one side of the Video Transfer box are the audio/video inputs; on the other side are two USB 2.0 ports and a power input plug. First, the easier part of set up is to plug in the power brick to the wall and connect to the power plug on the device. Then, connect video cables from the output of your video source to the inputs on this device. You can connect either via an analog video and audio cable (Yellow, Red, White tipped RCA cable included in the box) or by an S-VHS video cable and RCA audio cable for better video quality. The S-Video cable is not included, but is recommended for better quality recordings, and is what I used for my tests.

Now, you need to connect a USB destination device of some kind as the output device, and here it can get a little tricky, especially for Mac users. Of the two USB connectors on the side, one is the standard “square†USB connector typically found on the back of most USB drives. Forget about it, this does nothing and is reserved for future use. The other USB connector is a standard rectangular USB socket you would see on the side of most computers, and this is where you will connect the destination device. You have several options here on what to connect, and if necessary, you will need your own USB cable for this.
Now here is where it gets confusing: You can connect several devices here, a USB Flash drive, a USB hard drive, a Sony Playstation Portable, but it must be firmware version 2.81 or later, a Sony Playstation Portable Slim, an Apple iPod Video version 1.21 or later, an iPod Classic, or an iPod Nano, 3rd Gen only, and iPods must have firmware version 1.03 or later. You cannot connect directly to an Apple iPhone or iPod Touch.
OK, now it gets even more complicated. To use an Apple iPod with this device, the internal drive must be formatted FAT32, a WINDOWS file format. For most Mac users, this means you cannot just plug in your iPod. An iPod, iPod nano, and mini can be configured to work with either a Macintosh or Microsoft Windows computer. If configured for a Mac, the iPod will be formatted as Mac OS Extended HFS Plus, which will not work here. If configured for Windows, the iPod will be configured as file format FAT32. You can do a restore on an iPod and change the format if you wish, but it will erase everything. Also note that while a FAT32 formatted iPod will still work with Macs, it is a foreign file format, it will not be optimized for use on the Mac, there will be file name length issues, some sharing and permission problems for sure, and there is a 4 GB file size limit! That is the “cost†of directly recording from this device onto an iPod. And because the iPhone and iPod Touch cannot be formatted FAT ever, they cannot be used here. Confused yet?

The easiest way to handle recordings with this device is to use a USB Flash Drive or a USB hard drive formatted FAT16 or FAT32, so I will continue with that assumption for now. Have a look at this video to see how easily that works…
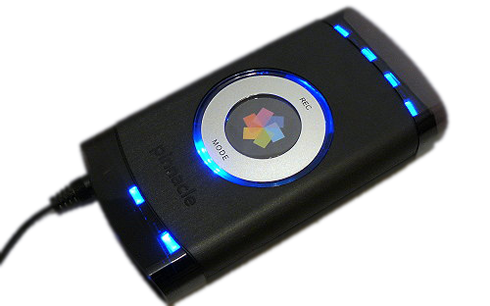
Now, since no computer is used to program this device, all the options are set on the device itself by pressing the MODE and REC buttons on the top. To change recording quality, use the MODE button on top. The higher the setting, the more HD space the recording will occupy, but the better the recording quality should be But that is also determined by what output device you have connected as well. Confused yet?
Well, to help, here are the settings and what they mean depending on mode setting and device connected:
| iPod | PSP | Other Devise | |
|---|---|---|---|
| Good | Video: 320×240 512 kbps video rate 96 kbps stereo audio 48 KHz |
Video: 320×240 512 kbps video rate 64 kbps stereo audio 48 KHz |
Video: 320×240 768 kbps video rate 64 bps stereo audio 48 KHz |
| Better | Video: 320×240 768 kbps video rate 128 kbps stereo audio 48 KHz |
Video: 320×240 768 kbps video rate 96 kbps stereo audio 48 KHz |
Video: 640×480 1.2 Mbps video rate 128 bps stereo audio 48 KHz Video: 640×480 |
| Best | Video: 640×480 1.5 Mbps video rate 128 kbps stereo audio 48 KHz |
Video: 320×240 1.0 Mbps video rate 128 kbps stereo audio 48 KHz |
Video: 720×576 (PAL) 720×480 (NTSC) 1.5 Mbps video rate 192 bps stereo audio 48 KHz |
As you can see, the best results are achieved with an external HD (other device) on the BEST setting. If this table confuses you, simply look at the column for what you attach, and then see the three choices you have. With a USB hard drive at Best, it will record 750×480 resolution at 1.5 Mbps data rate for the video, and 192 kbps @ 48 Khz stereo for the audio. Now confused?
So just how much time can you record on your device? Well, again that depends on the size and type of output device and the quality setting desired. Here are some examples of time for quality setting and device type:
| iPod 30 GB | PSP 2 GB | Flash Stick 4GB | USB HD, 250GB | |
|---|---|---|---|---|
| Good | 85 hours | 7.5 hours | 11 hours | 640 hours |
| Better | 61 hours | 5.5 hours | 5.5 hours | 320 hours |
| Best | 38 hours | 2.5 hours | 3.0 hours | 187 hours |
After starting a recording, it will stop if the device becomes full (obviously), or if you briefly press the REC button while recording. After stopping the recoding, you need to wait a short time before removing the USB device. The USB LED will turn RED, the quality LEDs will flash, and then stop. You can now remove the drive.
So, now if you recorded to an HD or Flash stick, when done recording, simply attach that drive to your computer, and then use iTunes to move the MPEG-4 files to your device.
SIGH!
Conceptually, this device is a great idea if it worked like you would expect: Connect video, attach an iPod, start the video, and press record. But as you can see, it is not as simple as all that. As I read through the instructions, I kept feeling more and more confused by all the things that COULD happen when I used this.
But in reality, if you forget everything else, simply attach a FAT formatted USB hard drive, and start making recordings, and then move them to your device using iTunes or file transfer, it actually is simple. Once I got it set up (meaning reformatting a USB external drive with FAT32) I made some sample recordings from my Dish DVR. The video quality on BEST was good viewed on a large screen, and BETTER looked good on the iPod Touch or iPhone. Even GOOD should be acceptable on the even smaller iPod Video screen as well. The audio is a different story, being full of video interference noise and ending up completely out of sync with the video. Not good at all.
Overall, I was disappointed with this device; and there are a couple of things I would have liked to see changed or added on this unit. First, for something that should be so simple, I found it to have a lot of complicated little gotcha points when trying to set it up. Secondly, direct video to an iPhone or iPod Touch would have been welcomed, but maybe that is an Apple problem really. Thirdly, support for file systems other than FAT would also have been appreciated. I think Mac users are an after thought with this device, since they rarely have FAT formatted USB drives sitting around. Next, at around $100, they should at least include a USB cable and maybe even an S-Video cable. Even cheap $15 USB drive enclosures include the USB cable! Lastly, you should be able to use the unused USB connector to attach this device directly to a computer, and then transfer the recording files directly onto the hard disk of your computer. This would be especially great for iPhone and iPod Touch users, as now you have to record to a USB device, then transfer the drive to a computer to move them to an iPhone..
But the killer for me was that all was not even close to perfect with the encoded video files, and I tried all three settings, and both S-Video and Analog video inputs to try and make them work. Most of the audio tracks had buzzing and other noise that appeared to be video interference with the audio, but did not occur in the source material. And almost all encodes had completely screwed up the audio and video sync, making it look like I was watching a badly dubbed foreign film. S-Video was always off, and by half a second or more, and on regular video, it started OK and then stuttered and went bad a few seconds in. And sadly, the sync problem got worse on better settings. I recorded to several different USB hard drives as well, just to be sure it was not a drive speed error, and the results were the same on all drives tested. If it were a drive issue, after trying 5, I would say that many people would have issues too.
Here is a sample of a recorded video straight out of the unit. (This file is 2.2 MB in size) recorded at Best setting via S-Video input. You will see the video quality is very good, but note the audio and audio sync issues with even this small recording.
Full version in .mov format here
MyMac rating: 2 out of 5. It kills me to rate this so low, as I really wanted this device to work well. It does record video files, but for a Mac , iPhone or iPod Touch user, it is a pain in the butt given the file type limitation. It was not as simple as it should be with a lot of complication in basic specifications to understand. But the true killer is the badly recorded video files with noise and sync issues. This drops this down a full 2.5 points in my view. It may be great for recording video game play where audio sync may not be so critical, but for TV and movies, this device needs a serious update, if that is even possible.
Update: After my first submission of this article and the problems I had, I was contacted by someone at Pinnacle. Seems there was a firmware update for this unit that I was not aware of. I did not even know you COULD update this unit, but it does say so in the back of the small manual that came with it (but who reads those?) I also did a Google search, but unless you use the word “update” along with “Video Transfer Pinnacle”, it could rather difficult to find this update.I guess one should always look for updates and read ALL of the manual. I am so spoiled by programs that update themselves, that I simply did not think to look further for something I never expected to exist. Basically, Pinnacle has the ability to update the firmware on the unit. You copy the new “bin” files to a clean, newly FAT-32 formatted memory stick, connect it to the unit and turn it on. The update took only a few seconds and happens automatically.
Imagine my surprise when recordings made with the update no longer exhibit the audio sync issue OR the noise I originally saw. This is now recoding exceptionally well, sync issues are gone, as it the audio noise. I was told that only a few units had this issue, and lucky for me, I received one of them. (You would think that companies would actually check units sent to reviewers first, but that seldom seems to be the case.) Here is a new sample video with the firmware update:
Update Video in higher-res .mov format
MyMac rating: 4 out of 5. I originally scored this 2 out of 5, and wrote that it kills me to rate this so low, as I really wanted this device to work well. With the firmware update, it really DOES work well, and makes some amazingly good recordings at all settings. However, there are still issues: For a Mac , iPhone or iPod Touch user, it is a pain given the file type limitation, but there are workarounds. It was not as simple as it should be with a lot of complication in basic specifications to understand.
email – MyMac Magazine – Twitter – Advertise – Reviews Archive – Podcast

What website can I go to to download the latest firmware and how do I do it? Please help me, I need to record more videos! Please!
I wish I had an answer for you. This is an old product that is no longer supported. I did find a YouTube video (https://www.youtube.com/watch?v=PVERNzcw02s) on how to do it, but the link it mentions is no longer supported.
However, a little Google Searching for “Pinnacle Video Transfer firmware download” returned some possible hits. Rather than test them all, you should try this, and when you find one, please post it here.
Thanks