Data Backup 3.0
Company: Prosoft Engineering
Price: $59.00 (US)
http://www.prosoftengineering.com
Everyone hates doing backups. I know I do. Like most utility software packages, products like this are ignored until it is too late, and your precious data is gone. It’s funny how diligent I was at work (I suppose my job being at stake had something to do with it…), yet I almost never backed up anything at home. I’ve been playing the odds for a lot of years, and have so far been pretty lucky.
The reality is that because nothing has happened, you get lulled into a false sense of security. When it finally does happen (drive crash, deleted a vital file, etc.), the cries of anguish are deafening. Again, it’s never happened to me, but that doesn’t mean it won’t at the most inopportune moment possible, because that’s how these things go. That’s why I urge all of you out there in internetland to get yourself some backup software and one of those amazingly cheap external hard drives. There has never been a better time to buy one of these USB 2.0 packages of storage goodness. When you can by a 500 gigabyte drive (that’s half a terabyte!) for under $125.00, and 120 giggers for around 50 bucks, there’s absolutely no reason in the world not to embark on a solid backup plan right this very minute. Can’t afford an external drive even at these prices? Most of your Macs probably have a CD and maybe even a DVD burner. A CD burner can put up to 700 megabytes on a disk, and a DVD burner, around 4.5 gigabytes (almost 9 GB on the double-layer disks). You know, these nice internal and external hard drives are coming down in price for a reason–they’re built more cheaply, and are likely to fail more unpredictably than drives of the past. It might last 20 years, or it might go out in a blaze of glory tomorrow.
Data Backup 3.0 from Prosoft Engineering is a terrific backup program. It supports nearly every kind of media: CD, DVD, hard drives, network drives, and I’m sure even more. It’s a real bargain at $59.00.
Installation is a breeze. It uses Apple’s “package” method of installation. Just double-click the Data Backup.pkg file, answer a few questions, and it installs in a flash.
Help comes in the form of a detailed and well-illustrated 45 page file that opens when you select Help from the Help menu.
I decided to use my dual 2.0 GHz G5 PowerMac tower as my test subject. It has the optional 400 GB drive, so there’s a lot to back up, though not as bad as it might seem, because I am not backing up the operating system or applications. I have the original media for those, so it seemed wasteful to back them up too, although you can if you want to.
That said, Data Backup 3.0 also gives you handy pre-written backup scripts so you can back up:
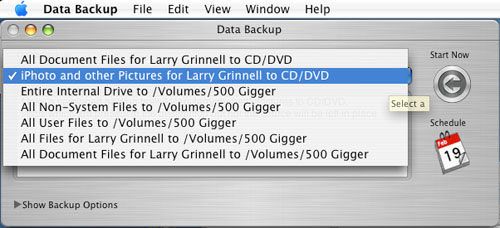
When you launch Data Backup 3.0, this is what the initial screen will look like, though without a volume name where you want to backup your files to.
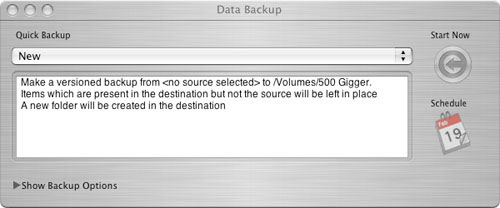
Setup is pretty basic. I won’t dwell on the preferences, as you probably won’t need to go in there, and if you do, the Help file will guide you through what you might need to do.
If you want to keep things really simple, you won’t even need to do much more than what you see in this initial screen, except for one teeny little thing–you need to tell Data Backup 3.0 where you want your backed up files to go: disk, network drive, or CD/DVD.
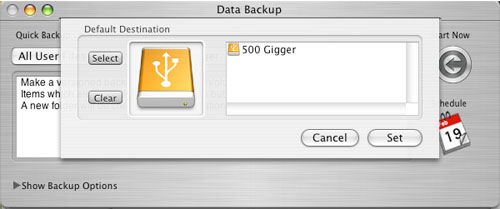
If it’s a local disk or a network volume, go to the File>Set Default Destination menu item. I have chosen my external 500 gigabyte hard drive, originally named as 500 Gigger. Click the Select button and choose your drive. If you want to back up to a network volume, first you will need to mount your network volume as you normally would from the finder. It will show as an option when you click the Select button. When you have made your selection, click the Set button. The pull-down menu items under Quick Backup get named with your backup volume.
Now, it’s just a matter of selecting the Quick Backup option you want. In this example, I am backing up my User files. Select All User Files to /Volumes/500 Gigger, and click the Start Now button. That’s all there is to it. Really. It takes less time to just do it than it did to read the description. The screen below is what it looks like when the backup starts.
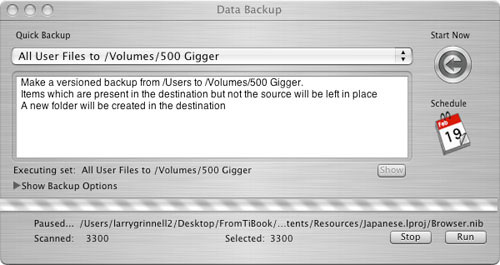
If you want to back up to CDs or DVDs, Data Backup 3.0 can do that, too, prompting you to insert a new disk when the one in the burner fills up. This is probably the best solution for files you really can’t afford to lose, so you can get them onto convenient media, and then move them to a safe place away from your computer (a fire- and theft-resistant safe, a safe deposit box, a data archival center, etc.). Sure, you can do this with external hard drives, but that gets a little more expensive. From the Quick Backup menu, make your backup choice: iPhoto or Document files to CD/DVD.
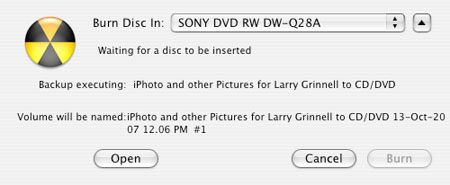
When you click the Start Now button, the screen below pops up, prompting you to insert a CD or DVD.
You can also schedule when you perform your backups. Click the Schedule (calendar) icon on the main screen. The first screen that appears the one you use to set selected dates for backups. You can also choose an interval (every n minutes, hours, days, or weeks), starting at a designated time, selected events (backup at system startup, or when a destination or source volume appears on the system), or simply which days of the week do you want to back up, at a given time. The more automatic you make things, the more likely you will be to actually use it.
There, easy to do backups that if you did nothing else, you would have safely preserved data from your system to a secondary storage place, so if the unthinkable happened, you’d still have your data.
But wait, there’s more! See that Show Backup Options triangle? That’s where the real power of Data Backup 3.0 is hidden. Basically, if you don’t need to do any more than what I described above, you don’t need to go into the options. If you’re like me, who has stuff stashed on multiple disks and maybe on network drives, and who knows what else, you will need this power.
Click the little triangle next to Show Backup Options and you will see what I mean.
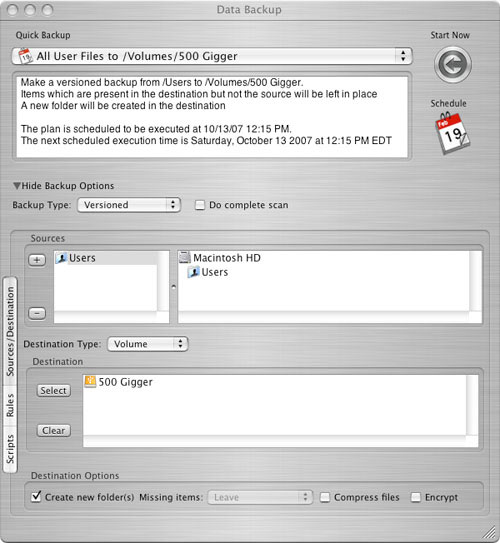
In this window, you can choose more data sources to back up by clicking the “+” symbol in the Sources part of this window. It permits you to select complete volumes or just some folders on different volumes, or maybe folders not stored within your /Users folder. You can also select multiple destinations for your backed up files by adding more volumes or folders to the Destination field. The Destination Type pull-down lets you select Volumes or CD/DVD for backups.
There are extensive “rules” that can be applied for backing up files, which can be found in the Rules tab (see above). Data Backup 3.0 is also scriptable, using Automator.
Data Backup 3.0 can compress your backup files to make room for more backups and other files on your backup volume, and if you have sensitive information, you can encrypt your backups. There have been a ton of articles in the paper lately about personal information getting disseminated because backup tapes were stolen, and they were not encrypted. Well, here’s your chance to protect your backup files (and maybe your job, if you are using this product for business). This program is so smart that a Preferences setting even automatically powers up your computer, performs the backup, and shuts it down again. Speaking of business (or for multi-computer families), Prosoft offers attractive multiuser licenses, too. Check out their product page at http://www.prosoftengineering.com/products/data_backup.php for complete pricing information.
With its default settings, a newer version of a file will overwrite the older version. In the Data Backup>Preferences menu, you can set Data Backup to perform more sophisticated Full/Incremental backups, where only the newer or replaced files are backed up, and older versions of files are retained in the backup archive. The Backup Type pull-down offers many backup methods: Simple Copy, Clone (make a bootable copy of your hard drive), Versioned, Full, Incremental, and Synchronize. Read the excellent online help manual for descriptions of each type and the advantages/disadvantages of each one. You can also download the version 2.1 manual at http://www.prosoftengineering.com/docs/DataBackupManual.pdf.
Depending upon how you configured your backup, restoration can be just as simple as dragging the contents of your backup drive back to your original drive. Otherwise, you can use the easy-to-use File>Restore feature to recover individual files or a complete volume, and if you do incremental backups, you can even restore your data to a specific date. I don’t mean to give this feature the short shrift, but you really need to try it for yourself to really appreciate how well it works in your own personal backup/restoration scenario. Again, read the online help file for complete details.
As much as I hate doing backups, this program is as powerful as anything out there, and I come from a strong Retrospect ((http://www.emcinsignia.com/products/smb/retroformac/)) background (I used Retrospect for 10 years in my office and never lost a file that was backed up, but if you want to buy a version of Retrospect that will back up to a network drive, or back up to one of the zillions of different types of tape drives still out there, it’ll set you back about 500 bucks). Data Backup 3.0 is strong, yet easy enough for me to set it, forget it, and perform my hated backups without having to think about it. I can’t imagine giving higher praise. Gee, about the only negatives I could come up with were that the manual posted to the website was the previous version, but the descriptions of types of backups and program fundamentals were mostly the same, so it isn’t a huge negative, and Data Backup 3.0 doesn’t back up to non-mainstream devices, but if you have specialized needs like that, you are probably already using Retrospect or something like it already.

Leave a Reply
You must be logged in to post a comment.