The Macintosh desktop is a special place. It’s the default target for incoming files, and things accumulate there. That is a good thing and a bad thing.
It’s good because it’s a handy place to put what you’re working on. It’s bad because the Mac keeps a constant watch on your desktop and if there are too many items there, it’ll actually slow down your computer.
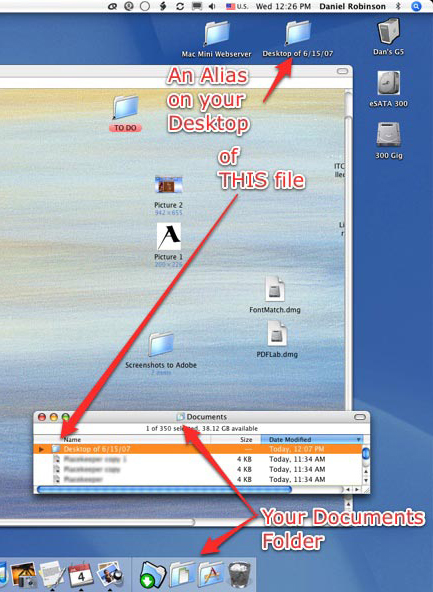
Take a look at the screenshot below. Drag it to your desktop (If you can find a clear place to put it) for a bigger view.

Problem #1 — The desktop is cluttered.
In a nutshell, here’s how we’ll solve the problem:
1. In your documents folder, make a new folder “Desktop of 7-7-7” or some other name that will make sense to you.
2. put an alias of this folder on your desktop (one of the few things that will go there.)
This becomes your “active” desktop . . . a place you can clutter up to your heart’s content without slowing down your Mac. When something appears on your desktop, just move it over to your Desktop of 7-7-7 window
So — In Mac Simple style — we’ll solve the problem by breaking it down into several easy steps
Step #1 — Prepare to make a target
Your “Documents” folder is the proper place for all those files that you accumulate.
Yes, I know you’ll lose them in there but I’m here to make sure that doesn’t happen.
Make it easy on yourself to do things the right way. Put your Documents folder on the dock. Drag it just to the right of the divider line. Now . . . no matter what windows are closed, you’re one click away from all your stuff. Open up the documents folder, switch to list view and sort by date (click on the column heading, Date)
Why?
a) No matter how many files are in your Documents folder, the most recent are on the top of the list. You don’t care that files from 1998 are at the bottom.
b) If disaster strikes, all your important stuff is in one spot. Recovery is made simpler because of that.
I’ll show you how to find lost files in “Mac Simple #3”
Step #2 — Make your template Desktop folder
(Control-Shift-n or pull down File to New Folder) will make a new folder in your Documents. Name it, “Desktop Template.”

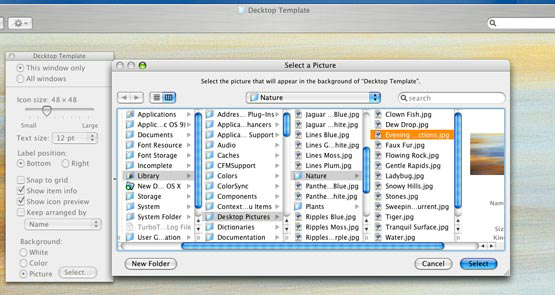
Open it and pull down View:Show View Options from the menu and pick a pleasing background.
Notice I have Show Item Info and Show Icon Preview checked.
Why?
a) This is a template you will use instead of going through all the motions every time.
b) Choose a pleasing background since you’ll be looking at it constantly. There’s nothing to prevent you from using a scene from Where’s Waldo, but the idea is to be able to see your icons.
![]()
c) Checking Show Item Info and Show Icon Preview will put a thumbnail pic on your icons and show the size of art files. This is valuable info if you have several versions of a picture, for instance. The one off the camera might be 3072 x 2304 pixels and several magabytes in size. Too large to send to Grandma. 640 x 480 is the one you want to email. But I digress.
Step #3 — Make the current Desktop folder
Now we’ll make the one you’re going to use. In the Documents folder, click once on Desktop Template and click File:Duplicate, creating Desktop Template copy. Rename it Desktop of 07-07-07 or whatever.

You can make an alias and drag it to the desktop. But there’s an easier way. Simultaneously hold down Command and Option and drag the folder to the desktop, creating an alias on the desktop with the same name as it’s parent (originating) file.
Double click on the alias and position the window so you can see around the edges . . . especially under your hard drive icons. This is where new additions to the desktop will arrive; easily seen and obvious, instead of buried in a morass of desktop icons and open windows.
There are several additional benefits to this system. When this get too cluttered, make a new Desktop-of folder and retire this one.
You can also use this system for special or current projects. Lots and lots of files all neatly dumped helter-skelter into their very own folder — the parent of which is in your Documents folder, where it belongs.

Leave a Reply
You must be logged in to post a comment.