Hewlett Packard G4010 Flatbed Scanner
Company: Hewlett-Packard
Price: $180
http://www.shopping.hp.com
My name is Art Schwartz and this my first MyMac.com review. I’m a Mac convert, a wannabe photographer, and a recovering academic. By “recovering academic†I mean I: (a) spent the greater part of my career pontificating to disinterested undergraduate students; and (b) am really trying recover my ability to communicate in a manner that is accurate, interesting and informative.
When I was contacted about reviewing an affordable flatbed scanner that did six color scanning up to 9600 dpi, I jumped at the opportunity. Since my Minolta Dimage 5400 scanner died and left me with the problem of still needing to digitize more than 5,000 images, I have been searching for a scanner that produces quality scans in a reasonable amount of time, that didn’t require a graduate degree in engineering to learn to operate, and wouldn’t require a home-equity loan to purchase. Therefore, I approached learning to use the HP G4010 to scan pictures, documents, film and slides with high hopes and great enthusiasm.
Almost everything you ever wanted to know about the HP 4010 itself
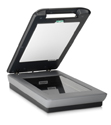
First, let me cover some essential stuff about the G4010 itself and then I’ll get into how it performs. The G4010 includes the scanner, USB cable, power supply, a short — actually, cursory —Setup and Support Guide (in four languages, no less), and the scanning software CDs. As you can tell from Figure 1, it’s a pretty sleek looking scanner with a top-hinged cover.
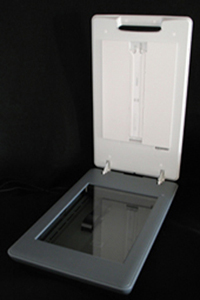
Notice the slot in the underside of the lid? That’s what HP calls a TMA (transparent materials adapter) for slides and film. Weighing in 9.6 pounds and measuring roughly 12 x 20 x 3.8 inches, it’s going to take some space on your desk or countertop. What you can’t see in this picture are the four buttons on the top of the lid that activate scan or copy functions.
Introduced earlier this year, the Hewlett Packard G4010 is one of the first flatbed scanners in its price range ($180 USD list; $125-150 USD street price) to offer the option of scanning in six-colors/96-bit scan with a resolution of 4800 x 9600 dpi resolution. When scanning with the six-color option, the G4010 employs an additional light source effectively adding three extra samples for each pixel. Scanned images are “truer in color, richer in color depth, and crisper.†The G4010 Product Specification on HP’s website describes the G4010 is a flexible, multi-featured, easy-to-use flatbed color scanner that performs a number of scanning and image editing functions.
The CD for the G4010 contains two programs (the HP Device Manager and the HP Photosmart Studio) for scanning, editing and managing documents, images and even objects. The HP Device Manager is the actual nuts-and-bolts software that offers an impressive array of features for scanning and editing images. In addition to being able to customize color, the Device Manager software offers tools for manipulating image resolution (72 – 19,200 dpi) sharpening, dust and scratch removal, restoring faded color, adaptive lighting (enhancing shadow areas) and controlling output dimensions. For slides and film, additional adjustments can be made to tweak highlights, shadows, midtones, and gamma .
But wait — in addition to its major function of managing folders and files, the second program (HP Photosmart Studio) also activates the scanning functions of the HP Device Manager. Furthermore, Photosmart Studio has the capability to stitch image files, create a slide show, or email an image.
With all these features I just couldn’t wait to install the programs, fire-up the G4010 and scan all those piles of documents and boxes of slides and negatives that I had shoved in the drawers of my desk. Wow! With a toolkit of goodies like that, I was ready to become a scanmeister. All these features make it tempting to turn your back on the old maxim that there’s a difference between having a feature, accessing a feature, and being able to use a feature.
Installation was straightforward and simple. No surprises — simply pop the CD in the drawer, follow the directions and the icons for HP Device Manager and HP Photosmart Studio pop up on your Dock. One nice aspect of the installation routine is that the software adds the HP G4010 to your list of plugins in Photoshop.
Almost everything you ever wanted to know about scanning photos, documents and even objects
The scanfest began by clicking on HP Device Manager. The vaunted six-color scans, the adjustments to resolution and sharpness, the restoration of faded colors and the dust and scratch removal features were of greater interest to me than the scanning speed and file size. I naturally presumed, that since the software ran on a Mac that it would be fairly transparent, logical and straightforward.
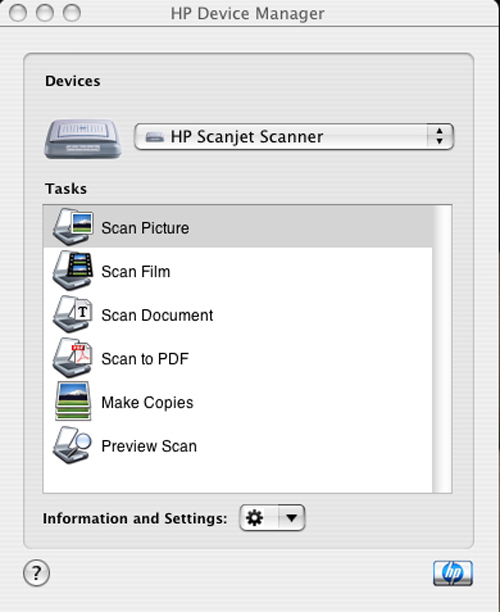
When you click on the HP Device Manager icon, you will see the pop-up screen containing a task list shown in Figure 2. I clicked on “Scan Picture†and watched for the action to begin. At first, it appears as if nothing is happening. After several seconds, an unobrustive light gray whirling circle appears and begins spinning.
After at least 30 seconds (trust me, I timed this several times), you can hear the scanner begin to work and the scanned image appears on the screen. The image, surrounded by “crawling ants†for cropping appears on the screen. The cropping option, is kind of tricky. You’ve got to place the mouse cursor exactly on the line to grab it. It takes practice, but by the 10th or 12th time you’ve done it you’ll be able to get it.
Once the image is cropped you can zoom-in and begin making adjustments. Figure 3 shows some of the notable array of adjustment options.
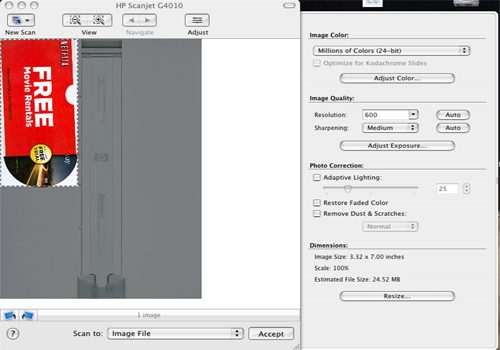
I tried the “Restore Faded Color†adjustment and was impressed with the marked increase in color saturation. “Remove Dust and Scratches†didn’t make an appreciable improvement in an ancient black-and-white photo I scanned. Given the time for the scan and the minimal changes, it would be better to remove the blemishes with the tools such as the Adobe Photoshop’s clone stamp or healing brush after scanning the image.
Six-color scanning is one of the most enticing features of the HP G4010, so my next project for this review was to examine six-color scans for color accuracy, richness, and crispness. I discovered that you have to go to the “Preferences†options in the drop down menu of the HP Scan Pro (that is HP Device Manager software) and check the box for six-color scanning.
It would have been nice if the authors of both the printed and online documentation had mentioned that the default setting is three-color and to take advantage of six-color capabilities you need to make manual adjustments. I couldn’t see much of a difference between three-color and six-color scans. After all the time and effort figuring out that six-color was an option, finding it, and getting it turned on, I was saddened.
The G4010 also offers the option of scanning with HP Photosmart Studio. The program does enable you to stitch and to create a slide show with scanned images. Those are two options not available in the HP Device Manager, so that may further justify the existence of HP Photosmart Studio.
The HP G4010 does a decent job at scanning documents and pictures although the software is less than intuitive, somewhat problematic and more than cranky. A few of the features are really neat and some aren’t as exciting as I thought.
Other features – such as the 30-40 second delay while the HP Device Manager calibrates itself or the difficulty grabbing and moving the crawling ants for cropping – will test your patience and dexterity. Scans at 300 dpi do not require unreasonable time or disk space. Unless you plan to make big enlargements most experts suggest that 300 dpi scans for documents are sufficient.
Almost everything you ever wanted to know about scanning slides and film
What is unique about the HP G4010 when it comes to slides film is how you get the original(s) positioned to be scanned. With many flatbeds or dedicated scanners, you use an adapter or tray to hold the original. Not so with the G4010. Look at Figure 4 and you will see a built in slide adapter, called TMA (Transport Materials Adapter), on the underside of the lid. It can hold up to five 35 mm slides or up to six negatives. Ergonomically, it’s a little awkward inserting/removing the slides or negatives.
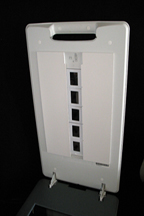
The bruises and abrasions on my head are still there from beating my head against the wall as I repeatedly scanned slides and film using the HP G4010. Disastrous might be an overstatement, but terrible would be a more accurate description of those episodes.
Ultimately, I discovered that there are five steps to follow to get each image ready for scanning: (1) click on the slide you want to edit to “activate†it; (2) click on the “+ View†button at the top of the window to actually activate it; (3) click on the options key at the upper right corner of the window to make adjustments; (4) adjust color, color, quality and make corrections as needed; (5) click on the “- View†button at the top of the window to go back to the list and go to your next image. Do not, repeat DO NOT, click on the “Accept†button in the lower right corner until you have completed the edits on all the slides. If you skip Step 5, you’ll really be sorry.
Should you ignore this advice and click on the “Accept†button before you have finished cropping and editing all the images in the series: (a) the nonintuitive, user-friendless software will beginning scanning ALL the images in the tray at the settings you made, and (b) the crops on individual images may slip. Once the scan begins, a dialogue box will appear telling you to press the command key to if you want scan. Just just press the command key. Hold it down. After a minute or so, everything might stop. By the time it stops, at least three images have been saved with wrong settings and you will have to locate those images, delete them, and start the process over again.
Make this mistake once and you won’t forget it. Better yet, follow my advice on Step 5 and click on the “- View†button at the top of the window after you have done your cropping and editing on the image. Click on the “Accept†button ONLY – repeat ONLY – after you have finished cropping and editing all the images you’ve put in the tray. Even better yet, put only one slide or negative in the TMA to be scanned one-at-a-time. You decide — it’s a trade-off between getting the image scanned and efficiency.
To be fair and thorough, a strip of black and white was pre-scanned and each was cropped and adjusted before actually scanning. During the scan, the crops and adjustments slipped so I had to toss them out and start again. Being both inquisitive and wanting to give HP the benefit of the doubt, I did a crop and adjustment on the only image I wanted to scan.
The software promptly proceeded to scan all the negatives on the strip. Like HAL in the movie 2001, this software seems to have a mind of its own. This is inexcusable in this day and age and from a company the caliber of HP.
Finally, everything you want to know about what I’ve concluded from 40+ hours working with the HP G4010
I’ve worked with enough scanners, both flatbed and dedicated, to know that their technical capacities often exceed the code that was written to operate them, that the software is often nonintuitive, and that these devices can be cranky. But, is the quality of the scan worth the effort to learn and operate? And, is the quality of the scan worth the cost? If so, it’s worth putting up with the idiosyncrasies of the device.
Although the G4010 produces decent quality scans of documents, I question whether the hassles are worth it. It does a fairly decent job of preparing and scanning slides to be worked on in a real editing program. Scanning black and white or color film, is somewhere between worthless and a waste of time because of the software’s idiosyncrasies. Given the struggles to make it work, the cost, and competing scanners, I also question whether the G4010 is a real value.
In many respects, scanning with the G4010 reminds me of an academic administrative assistant where I used to work. If you groveled sufficiently, and were willing to put up with her crankiness at doing a task that was part of her job, she might condescend to do the task when she could see fit to fit it into her schedule. The product of her efforts was usually passable, but it typically wasn’t worth the hassle.
That almost wraps up the first review I’ve been asked to do for MyMac.com. As I worked on the last couple of paragraphs of this debut review, I’ve realized that because of my rather negative impressions, this might also be a retirement review. When I introduced myself at the beginning of this review I called myself a recovering academic. I guess, candidly, I’m still an academic, because I still have to call things by the right name.

Leave a Reply
You must be logged in to post a comment.