Anyone who regularly shoots digital photographs realizes just how easy it is to fill up a photo management system like Apple’s iPhoto with thousands of images. In fact, uploading, managing, and processing digital photos is probably the most difficult part of digital photography. Everyone loves to shoots pictures, but digital photos can easily fill up a hard drive just in same way many old school shutterbugs could fill up shoe boxes and plastic covered album pages.
If you’re using iPhoto, or any other photo management system, it’s very useful to develop and maintain a practical workflow for importing, organizing, processing, and outputting your digital images. Having a workflow can enable you to process photos faster and make photo management effectively manageable. I would never say that digital photo management is fun, but I would say that it’s a lot better than keeping your photos in shoe boxes.
First off, if better digital photo management is going to be one of your new year’s resolutions, I would suggest reading Peter Krogh’ The DAM Book: Digital Asset Management for Photographers (O’Reilly Press) for some very powerful suggestions about the subject. His methodology for photo management is largely for professional and prolific digital photographers, but it’s a good resource for anyone interested in the subject.
Though I’m moving away from iPhoto for my management system (now using Apple’s Aperture and Adobe’s Bridge program), I did create a workflow using iPhoto that helped me complete client projects in a much more effective way. My workflow for using iPhoto largely revolves around family and professional wedding and event digital photography. Because I shoot of a higher volume of professional photos than family projects, I used a couple of client projects to establish and literary document (with a typed outline and screen shots of the process) of my workflow. If I were still using iPhoto for wedding photography, I would regularly perfect my workflow to make it even more useful. I’m now developing the same process for using Aperture and Bridge.
Each user’s workflow will be different, based upon purpose, needs, resources, time, experience, and creativity. So in this article I will simply to provide general guidelines for creating a workflow using iPhoto 6 or a similar program.
Step 1: Deleting the Duds
The first part of digital photo management is to get rid of the duds. I try to delete as many photos from on my digital camera while I’m on a shoot. The most obvious duds might include:
Seriously out-of-focsed/blurry photos that can’t be repaired even in Photoshop C2
•The subjects in the photo are not appropriate. Maybe their eyes are closed, their back is turned toward the camera, or they are clearly shown in an unflattering light.
•The photo is simply uninteresting to you as a photographer. You know you’re not going to keep it after you upload it to your program.
The criteria for what is a dud is of course subjective, but it’s important that you don’t simply hang onto bad photos in your digital camera just because you shot them. Learn the features of deleting photos from you camera and use that feature regularly and wisely. This will not only save time, but it will make you feel better about the good and much better shots left on your digital card.
Step 2: Importing, Rating, and More Deleting
With iPhoto, there’s really only one way to import photos. The program essentially does the storing and labeling of photo files for you. It’s rather cumbersome to get your photos in iPhoto’s file system. But there are plenty things you have control over once you have your photos imported into the program.
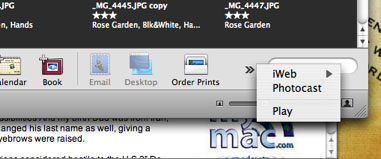
After you import your photos into iPhoto, you should view them using the Play slide show feature. This can be easily done by pressing the Play button in the tool bar at the bottom of iPhoto. The is Play feature does not build a slide show that you can return to after you play it. It’s purpose is to provide you quick way to view your photos.

If you can’t see this Play feature, it’s because it’s hidden in the arrow. You don’t want to create an actual slide show at this point. So when you set up this Play feature, deselect the Automatic Ken Burns Effect, choose None for the transitions feature, and turn off the play music button. Deselecting these features will enable you to delete and rate photos a lot faster.
Rating Your Photos
As you run this Play slide show, simply click on the stars to rate your photos. You should have some sort of rationale for your rating method and try to be consistent with it. In my view, how you rate photos depends on what type of photography you do and what your purpose is for rating them. For example, for my wedding photography projects, I give higher ratings for photos that will be useful for a wedding album, slide show, and other forms of media projects for my clients. I know going in that most of my photos will be rated a 3, which means they’re good enough for 4×6 prints.
In fact, now that I’m using Aperture and Adobe Bridge, I batch rate all my imported photos with a 3 star rating and then raise or lower those ratings as I process through the photos. You can do the same with iPhoto. Before you run the slide show, select all the photos you want to rate, control or right click on a selected photo and give them all a 3 star rating. When you view these selected rated photos in the slide show format, you can simply increase or decrease the rating.
While rating photos in the slide show format, you can also delete unwanted photos by clicking the trash can icon, or you can give all the photos you’re thinking about deleting a rating of 1 or 2. Either way, iPhoto will not permanently delete your images until you’re ready to empty the trash can. The important thing is to reduce the amount of photos you’re importing into your hard drive, but at the same not be so hard on yourself whereby you delete photos that you later wish you hadn’t.
Step 3: Backup
Backing up and archiving photos is to me one of the weaknesses aspects of my current workflow program. I don’t like burning photos to DVDs, though I typically do so to be on the safe side. I prefer to simply have my photos backed up to external hard drives each night using the .mac Backup system. There should be some sort of plan and purpose to backing up and archiving your photos. I back up my family photos on a DVD disc about every four to six months depending on how much shooting I’ve done. These files are also backed up to an external hard drive. Additionally, because I regularly post many of my favorite images on my Flickr account, I view that as another way to archive my favorite photos, especially beyond my home computer.
Step 4: Titling and Keywording
The key to effective digital management is being able to find your photos when you need them for various purposes. iPhoto makes that process extremely easy.
Before or after you’ve deleted unwanted photos, you want to give them a title according to their subject. Because the metadata (the date and time the photo was taken, for example) are included in each file, renaming and keywording these files won’t do any harm. (By the way, it’s important to make sure the time and date stamp on your camera is always correct and maintained. Though you can change date and time metadata after you import files in your computer, it saves you time if it’s recorded correctly before you import. I’ll explain below why even the correct time is important when using iPhoto.)
Keywords, Ratings, and Smart Albums
For my wedding shoots, I have a set of 15 keywords I use for each project. I title all the photos with my clients’ first name. I then keyword groups of photos accordingly, e.g. ceremony, Bride, Bride&Groom, Family Portraits, cake cutting. I use these key worded photos to set up a smart albums—my most favored feature in iPhoto and Aperture. Using the title and keywords, I can set up smart albums that get updated automatically as I change the rating or keywords of various files. I even crate a smart album for client photos that are not keyworded or rated just to make sure I haven’t looked over some photos in the process. When you shoot several hundred to a thousand photos at a time, using the smart folder feature is a huge time saver.
You should always use Smart Albums that hold your best five star rated photos and another album for lowest rated photos that you might end up dumping, depending what you plan to do with them after they’re processed.
If you think Smart Albums (File>New Smart Album From Selection) are too time consuming to create, be sure to at least manually select groups of photos and put them in a regular album (File>New Album From Selection.) iPhoto comes installed with default albums, such as one for the Last Roll of photos you imported into the system, but you need to take advantage of creating specifically labeled albums and folders in order to find photos and keep them grouped together. It’s a serious waste of time to have several “untitled” folders and albums that you have to go back and click on to discover their content.
Step 5: A Hierarchy of Folders
Creating a filing folder system is about much fun as making up your bed, but making use of iPhoto’s folders features can save you lots of time when managing and sorting through photos.
I recommend creating folders to hold sub-groups of albums. In terms of my wedding projects, I create one folder with the names of a wedding client. That folder will house all the smart albums, regular albums, slide show, book and calendar layouts associated with each client. After I finish a clients’ job, I move their folder in to another folder titled Archives. I leave these folders there for a few months, but I also archive those photos on a DVD where they will contain all their adjustments, ratings, and keywords. Aperture has more robust archiving features in this regard.
So basically I try to keep no more than three or four holding folders and a few albums on the left side panel of iPhoto at any give time. This hierarchy enables me to get a subfolders a lot quicker and to keep the left side of iPhoto less crowded long rows of albums and projects. The hierarchy will be different of course for each user, but the important thing is to create a structure that helps you get through projects without a lot of fuss. If you leave folders or album untitled it will simply mean having to click on the several times to discover their contents.
Step 6: Image Editing
While iPhoto has some very useful editing and image adjustment or improvement tools, it’s not a very good program for digital power shooters. Simply put, iPhoto lacks a batch processing features found in Aperture and Adobe Bridge. But again if you’re not a high volume shooter or professional photographer, this shouldn’t stop you from taking advantage of iPhoto.
In terms of batch processing, I wrote a short article about an excellent third party program called iPhoto Batch Enhancer which is useful if you have small jobs. I used it several times before moving on to Aperture.
Sort by Date
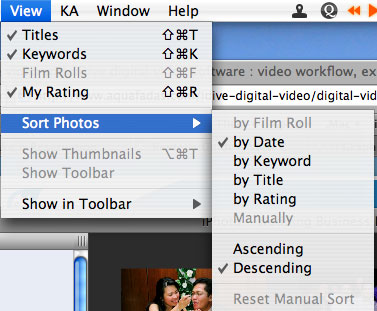
Another way to sometimes speed up the process of making image adjustments in iPhoto is to sort photos by date. By doing this, photos get grouped together based the date and time they were taken. Photos that were taken within a few seconds or sometimes even minutes of one another will often share the same lighting and exposure conditions. This means that if you use iPhoto Batch Enhancer, you can copy the image adjustments you made to one photo and apply them to one or more others. Even without the Batch Enhancer, though, you still can take advantage of sorting by date as you edit, for you can also compare photos and manually make similar adjustments where needed.

Making Image Adjustment
There’s not much to an image adjustment workflow in iPhoto. But when I use the program, I basically work from the bottom up on the Adjust palette(Levels>Exposure>Sharpness>Temperature and Saturation> and Contrast/Brightness only if needed.) Before using these adjustments, I also click the magic Enhance button to see what effect it will have. Sometimes it really does a surprisingly effective down and dirty job. I avoid using the Brightness/Contrast feature mainly because the Levels and Exposure adjustments do a better job. You’ll notice that when you make changes using the Brightness/Contrast adjustments, those changes are also made in Levels and Exposure at the same time.

Many photographers will say that Sharpening should be done last, but I find it helpful to sharpen a little before adjusting for saturation or tone. A little sharpening creates more clarity in the photos when making other adjustments.
Step 7: Do Something with Your Digital Photos
Now comes the fun part of the digital photo workflow: actually doing creative things with your images. For many digital shooters, their images rarely make it out of the camera, or at best they make 4×6 prints and that’s the end of the process.
If you’re shooting photos to make money, it’s quite easy to know what your output will be. The goal is sell your work, be it in the form of single photos, albums, or archival DVDs.
But as part of Apple’s iLife programs, iPhoto was equally designed as a powerful, multimedia output application. The system is set up to easily make slide shows, photo books, calendars, and greeting cards. The Share Menu is just about that, sharing your work by emailing or exporting your work to for website display are as part of a multimedia DVD project. Again, Apple made this sharing, output process very clean intuitive. Nearly all of Apple’s other multimedia programs connect directly to iPhoto. (I wish the same were true for Adobe’s Bridge.) Even Apple’s professional photo management program works with her now little sister, iPhoto. (The best resource for getting these and other type of image process done in iPhoto is David Pogue and Derrick Story’s iPhoto 6: The Missing Manual (Pogue Press/O’Reilly.)
So there’s no reason not extend the workflow process and create say an iDVD slide show of last year’s family photos or a professional looking calendar of selected for your son’s soccer team. The more you share your photos, the more you’re realize the power of a good workflow process. It’s really that simple.
Last Words
Finally, before closing this article, I must add that digital workflow management can seem very right brain and tedious at times. Applications constantly change, and there’s always something you wish an application would do to make the workflow process easier or more productive. But as you begin to figure out and develop a workflow process for your individual needs and purposes, you can begin to make wiser decisions about new applications or application updates you will want. You can make decisions about whether iPhoto addresses all you needs or whether Adobe Bridge is more suitable to your needs as a RAW photo shooter. Whatever the case, I predict the digital workflow process will only get better and more exciting for digital photographers because that’s what good application programs and workflow processes do. They help users get work done effectively in a shorter and shorter amount of time.

Leave a Reply
You must be logged in to post a comment.