Once you have downloaded your pictures into iPhoto there are many ways you can edit your photos. One of these techniques is cropping.
Cropping, in simplest terms, is getting rid of what you don’t want in the photo. iPhoto makes cropping easy.
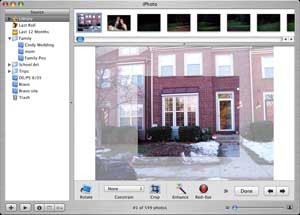
To crop a photo in iPhoto you start by double clicking the thumbnail in your Library to switch into edit mode. Once there you click on the photo and draw a box around the portion of the photo you want to keep. If you want to change the size, move your pointer to the corner of the box. When it becomes a cross-hair (+), click and drag to resize. To move the selected area around, move the pointer to the center of the selected area until it becomes a hand. Click and move the mouse, and you can adjust the placement of the area.
Next, click the crop buttonunder your photo. The unselected portion of your photo will be removed, and you will be left with the selected portion. It is as easy as that.

If you want to crop the next photo, click the right arrow to move forward in your Library. If you are finished, click done.

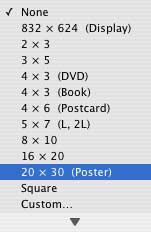
Cropping using the method described above is great. However, suppose you need your photo cropped to a specific size: 8×10, 3×5, etc. That is just as easy. Below the image, on the left, you will see a pulldown menu called “Constrain.†By default this is set to none.

If you click the menu you will see numerous, standard photo sizes. Choosing any of these will automatically resize your selected area to an area in proportion to that dimension. If you do not have an area of the photo selected, it will be selected for you (also in proportion to the chosen size). You can still resize the selected area, and move it around, as described above. Once you are happy with the placement, click crop, and you are done.

In older versions of iPhoto the Constrain menu let you choose if you wanted a landscape or portrait orientation. For some reason this has been removed from iPhoto 5. In order to change the orientation of the selected area, you need to hold the option key while clicking the corner of the image where your pointer becomes a cross-hair. At this point move the cross-hair into the image, and the orientation should change. This is a bit tricky, and takes some getting used to.
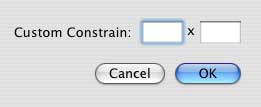
Another, and this time welcome, new feature to iPhoto 5 is the option to set a custom size when constraining your photo. If you look at the Constrain menu, at the very bottom you will see “Custom…†By choosing this option, a window will drop down where you can enter the size you want to crop to. Enter your dimensions and click OK. iPhoto will create a selection box in proportion to the dimensions you just entered. Once again, you can resize and move the selected area around like before.

After you crop one photo, the custom size will remain in place on the next photo for cropping. You can always change it, but it’s a great time saver if you want a bunch of photos the same non-standard size. The other option would be entering the custom size over and over and over… You get the picture.
This feature proved to be very handy at my school recently. We needed hundreds of photos cropped to 3â€x3â€, which is not standard size for constraining. Using this feature, we were done in no time, and there was no need to trim 3â€x5†prints, or import everything into iPhoto and crop them there.
Now that your images are cropped, they are ready for printing. Or are they? Keep reading Macspiration for more tutorials on editing your photos in iPhoto.
Email questions and/or comments to donny@mymac.com or post below.


Leave a Reply
You must be logged in to post a comment.