If you’re always looking for ways to get your computer to work for you instead of making you work harder, Tiger’s Automator program may provide some solutions.
Automator is basically AppleScript for the rest of us. With this program you don’t need to know special coded language to boss your computer around. If you want to, for example, rename, resize, or email a set of photo files, an Automator workflow can it for you. Taking a look into Automator you’ll find a batch of pre-installed actions and workflows to get you up and going. There’s Actions for every iLife program, TextEdit, Font, and the Finder.
Apple also provides Automator 101 tutorial that introduces you to the familiar select, drag and drop actions of the program. And Automator World provides a growing collection of pre-built, free Action downloads for various applications and actions.
One of the few workflows I’ve created includes this very simple one that can be done in as little as ten minutes. I also have another workflow, Screenshot to TextEdit, posted on Automator World.
As you probably know, iCal can remind you of appointments and tasks when you set it to send you an alert message either as a pop-up window, a particular sound, or as an email message. So say you want your iCal reminder to open up a particular website for you on a certain day or time. Perhaps you need a reminder to purchase flowers on a selected website a few days before Mother’s Day. Or maybe, like me, you have a site for a television program that you want opened up on a weekly basis so you can check the show’s programing. Well, here’s how you build that workflow in Automator.
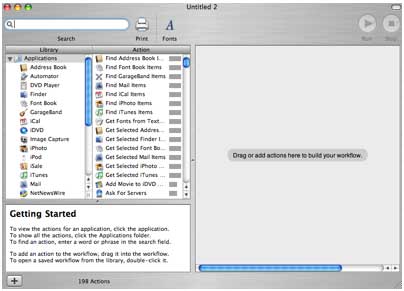
1. Open up Automator and select File>New. You’ll be presented with a window consisting of a list of applications that have actions built and installed for them. In the second column, you get corresponding actions that go with each selected application, and the larger third column is the area where you build your workflow. The smaller box on the bottom left will describe briefly what a selected action will do.

2. Open Safari and go to the website page that you want the Automator workflow and iCal to display.
3. With the website still open, go back to Automator and select Safari in the Library column, and in the next column select Get Specified URLs. Drag and drop this action into the workflow window. Deselect or delete (using the minus button below) the pre-selected Apple website URL, that is unless that’s the site you want to display. Now click the Current Safari Page button. The URL of your selected webpage should appear in the action.
4. Go back to the Action column and select and drag the Display Webpages action into the workflow.
5. Go to File>Save As Plug-in. In the drop down window, click the Plug-in button and select iCal Alarm. Give the workflow a name and click Save.
6. Open up iCal and set up the date(s) you want your selected webpage to be displayed.
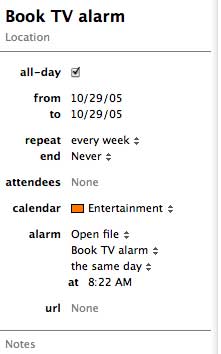
7. Select “alarm” and choose Open file. Now click on iCal and you should find the name of your previously saved workflow.
Also set when and what time you want the iCal alarm to run.

Your workflow is now ready for action. If you need to make changes to this or other workflows, you will find them saved in My Workflows at the bottom of the Library column.
Completing this or other basic workflows will lead you create others that are particular to your needs. When you need help on a workflow, hop over to Apple Discussion for Automator where you’ll get almost immediate feedback from experts and novices alike.

Leave a Reply
You must be logged in to post a comment.