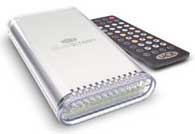
SilverScreen
Company: LaCie
Price: 40 GB at $249, 80 GB at $329
http://www.lacie.com
Every once in a while I find a cool toy I just have to try out. And while not only for the Macintosh, if your looking for a Media Center you wanted the MacMini to be, this is one device you are going to want to consider adding to your stack of toys.
Basically, SilverScreen is a 40 GB USB 2.0 hard disk in a very cool see-through plastic case (an 80 GB version is also available.) Yea, I know, big deal, who cares about another 40 GB external USB drive, especially at a cost of $249? Well, you just might! Unlike any other 40 GB drives of this type and size, this one is not really meant to be connected to your computer much of the time. Rather, this hard drive wants to stay attached to your TV and stereo system! That’s right, this is a hard disk that IS a media center. Measuring just 5.5 “ long, 3.5†wide, and about an inch high, everything you need to bring music, pictures, and videos to your TV from your computer is right there in that little box, and it is simple as can be.
Basically, it works like this: You connect it to your Mac or PC, copy videos, MP-3s and pictures to the proper folders already on this drive. Then, you carry it to your TV and plug it in. On the back of this very cool looking device are 3 interesting connectors: In addition to the USB 2.0 connector, there is an HDMI audio/video output connector, and a digital audio output. The outputs on this drive will directly connect to your TV and audio system, basically becoming a stand-alone media center.
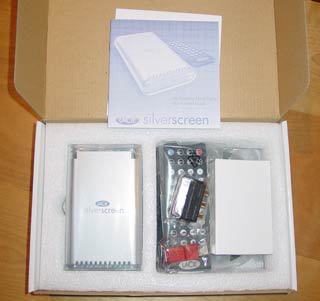
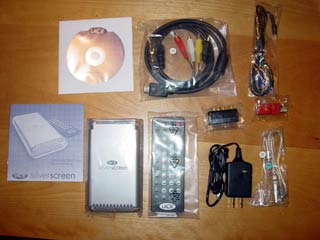
Included in the box is everything you need to make this work right out of the box, except the content of course. Included are: The rather small drive, a very small power brick, a mini-USB 2.0 cable (which is just a bit shorter than it should be), a composite video cable, a SPDIF (Sony/Phillips Digital Interface) audio cable, a USB power boost adapter, a SCART video adapter (which will never be used in the US!) a CD of Utilities, a worthless Quickstart guide, and a remote control. YES, this hard drive has a remote control, more on that later. When connected to your computer, power to the device is supplied through the USB connector (or an adapter to use the brick if your USB does not supply power.) When connected to the TV, it must be powered directly from the power brick only.
Plugging the supplied USB cable into the drive and then my PowerBook (without the brick or adapter) caused a small green light to appear on the front of the drive, and shortly thereafter, the drive icon to appear on my desktop. Strangely enough, this device made literally no noise, so I was not sure it was even working at first! It is quiet, which it MUST be to survive near a TV or in a Living Room. Double clicking the drive icon, factory named to “40†(or “80â€) reveals 4 folders inside: Firmware, Movies, Music, and Pictures. Of the four, only firmware contained any files, which you should leave right where they are. In fact, all 4 folders should be left at the top level, but adding more folders is not a problem if you want to store data on this drive too.
Adding your content to this drive is as easy as dragging files from your computer to the proper folder on the drive, which will then become accessible through the drive’s TV interface. Anything else you put on this drive will simply live as data on a hard drive. Transfer rates across USB 2.0 (up to 480Mb/s) were very fast, with 500 MB of data taking less than a minute to transfer. The drive comes pre-formatted in FAT32 to be compatible with both Mac and PC, but this limits maximum file size to 4 GB. For most media files, this should not be a problem. It also limits certain characters in the file names, so some legally named Mac files may refuse to copy until you rename them “FAT-32 friendlyâ€, meaning special characters and slashes need to come out of the name. Unfortunately, the included Quickstart guide did not tell me much, including if the files all needed to be in the one directory, or if additional directories inside the top level ones were allowed. So I dragged a bunch of MP-3 files, some jpeg images, and a bunch of different video files, including MPEG, DiVx, QuickTime, and Windows Media files to the drive, some as files, and some as files in folders. Since the Quickstart guide said nothing about supported files either, I had no idea which files would work, but I was about to find out. After about 10 minutes, I had sufficient content to move to drive off my computer and to my TV. Sure would have been nice to see a manual on this thing, but at this time, I did not find one.
Connecting to your TV is fairly straightforward, but there are a lot of options and ways it can be connected. The supplied A/V cable connects to the drive’s HDMI connector; the other end has three of your typical RCA connectors, similar to what you might use to attach a VCR or DVD player to a TV or A/V amp. Basically there is a red and white stereo audio pair and a yellow video connector, plus there is an S-Video connector as well. For analog TV use, you can plug these into you’re A/V receiver, a VCR, or directly to your TV if it supports such a connectors. If you have an HDTV receiver or a VGA monitor, there are cables available that supply the proper connectors to these devices, but not from LaCie (more on this later too.)
If you support digital audio, the drive has a SPDIF digital output, not standard on today’s TVs but is found on most new A/V receivers. The supplied coax cable (SPDIF typically comes in two flavors: optical and coax) will give you true digital audio from the drive to you’re A/V receiver for even better audio quality.
After connecting the drive to my TV, I plugged in the power brick. The drive spun up and a video screen appeared a few seconds later on my TV with a menu of 4 options:
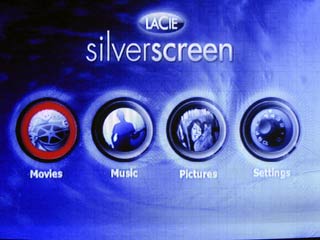
Movies, Music, Pictures, and Settings, with Movies already selected. I picked up the small, VERY thin remote and pressed “play/enter.†I was taken to a second menu where I could see both the video files I dragged into the Movies folder directly, as well as the folders I dragged in as well. Up/down/left/right arrows allowed me to navigate this screen to select one of these files, folders, or switch to one of the other 3 modes. Similar screens for Music and Pictures work the same way.
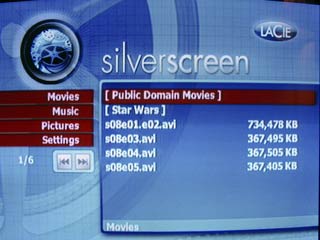
Before playing anything, I decided to check out the settings, so I navigated to the Settings button and hit enter. I was offered a number of set up options, including the ability to choose one of 13 languages (more were offered but not selectable), digital or analog audio, video output in NTSC or PAL Composite/S-Video, Component, SCART, as well as HDTV component in 480p, 720p, or 1080i! You can toggle through all these modes also by pressing the “Video Output†button on the remote, but all this really does is cause your video screen to go screwy until you find the right one for your set-up, and you just have to keeping hitting this button until the display finally comes back! This unit, with the proper cable will support any standard display including TVs (PAL and NTCS), video monitors, plasmas, LCDs, video projectors, and VGA monitors. Ok, time to look at some content.
First to the pictures: I navigated to one of the folder I put on the drive, and hit enter. I saw a list of all the pictures in that folder. I selected the first one and hit enter again. Immediately the picture filled my TV screen. The quality was amazingly clear and crisp for a digital picture on a TV display. In no way did this look like a typical computer output connected to a TV. It was easy to select the pictures one by one and navigate through them, but not until later (when I found the “manualâ€) did I discover how to start a slide show in name order or random order. Pictures of various sizes and resolutions were all expanded automatically to fill the screen, and artifacts from expanding smaller pictures were quite acceptable, again a better job than most computers do.
Improvement is needed on the transitions between picture as the screen often jumped when image resolution or sizes changed, which I found distracting. Also, pictures display in name order, regardless of the order you put them in the folder, and some control over this would be a welcome option, say a play list or display order by date and size? I would also like the option to play MP-3s, or a list of MP-3’s while the slid show runs; after iPhoto, I need music with my pictures, and there ARE MP-3s on this disk. Photo mode only supports JPEG files, in size up to 8 Mega pixels.
Video was just as easy to start. I selected one of the Divx AVI files I had copied to the drive and pressed enter. Immediately the video started to play and again quality was amazingly good. I should mention that I have both a computer in my video rack with analog video out, as well as a Phillips DVD player that plays AVI files. I compared the same AVI file on all three, and the output on this device was vastly superior to either of those devices. I would have liked to see how this device looked on my HDTV as well, but I did not have that cable. During playback, a time search feature lets you enter a time in hours, minutes, and seconds and jump directly to that part of the video. It was not fast, but it worked. You can also fast forward or rewind, but these functions were marginal at best and often buggy in how they responded. This device also supports Divx’s VOD service that lets you download movies from the net, and rent or buy them. Think of it a little like Netflicks over the Internet.
Navigating through the folders I put on the disk, I quickly realized that .mov files (Quicktime) as well as wmv files are not recognized by this drive, and not even displayed as a choice, but .mpg files were displayed and played just fine, again looking better than the computer output of the same file. For video, the drive supports MPEG-1, MPEG-2 (avi, vob and iso) and MPEG-4 (avi, DivX 3.11, 4.x and 5.x, and XviD)
Music files were as easy to select as pictures and videos, and again sounded as good if not better than playing MP-3’s from my computer or MP-3’s on the Phillips player. The files again displayed only in alphabetical order and playing ONE was straightforward. However, it was again not immediately obvious how to set up a play list, or even if I could get it to play the entire list. When the selected song ended, the music just stopped, not going on to the next song as I expected. Later I discovered a yellow button on the remote with almost impossible to read tiny white text which said “Play All†which obviously solved this problem. A similar button labeled “shuffle†played all in random order. These buttons worked in a similar way for movies and pictures alike. Here again, as in all functions, a play list feature is badly needed. Also, there seemed to be no screen saver or “visualizer†available while listening to music, and I was not able to navigate the menus or go to settings while the song was playing. After I stopped the song, I did find a screen saver setting for 5, 10, or 30 minutes of no activity in the settings screen, but when it did finally activate, it simply turned off the unit completely, which caused my TV to turn off a few seconds later from lack of video. It would be nice to have something visual while listening to music, be it pictures or a graphical display while music played, or even song info moving about the screen. Here, nothing but the menus and the time into the current song. The device supports music files in WAV, WMA, MP-3, MPEG-4 (AAC), ACE (Dolby) and OFF formats, with analog stereo as well as digital audio formats. Support for Dolby Digital 5.1 and DTS pass through are also supported, but I did not try the last 2 out for lack of a source.
Total control of the drive while connected to the TV is ONLY via the included remote so DO NOT loose it, or you will basically have one very expensive external HD. Speaking of loosing it, the remote is so thin, it easily slipped into the cracks of the sofa several times while watching videos, and I worried one of these times it would easily snap in half if I happened sit on it. And there are way too many tiny buttons with tiny text on this tiny remote. Unfortunately for anyone over 30, the button text is so small you will need to put on glasses just to read the labels while controlling this device, which is annoying at best. And to add insult to injury, some of these buttons, as stated earlier, contained white text on a yellow button, almost impossible to read in the dim light of a TV room, and the remote had no backlight to help. To make things worse, the buttons are laid out in a simple large grid, with no reference buttons by look or feel, and little obvious logic to their layout was evident. Even the number keys are not laid out in the typical phone or TV remote pattern, with the “0†button off to the left of the #1.
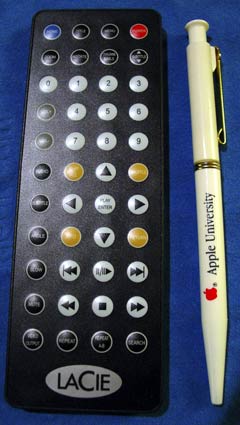
I also found that response was either slow or lacking with some functions. Sometimes I did not know if the function simply did not apply, if the drive missed the IR control, or it was just slow in responding. A yellow LED does flash on the drive letting you know the device saw a key press, but response time was variable on some commands, or did nothing on others.
I also discovered a number of logic “strangeness†from the remote as well. For example, fast forward moves the picture on a movie file forward at 8x, 16x, 32x, and 48x. But when going back to play (by pressing “play/enterâ€) a “PLEASE WAIT†would appear and it took as long as 10 seconds to actually resume video play, and then not exactly where I hit play. Pressing rewind often caused the drive to simply stop and return to the video menu. And play will also return to the video menu if you fast rewind to the beginning of the video you are watching as well, rather than, as I would expect, going back to the start and simply pausing. I also discovered pressing Rewind when in Fast Forward or Fast Forward while in Rewind caused some unpredictable behaviors I cannot even begin to describe. Other buttons, which I expected to do something, seemed to do nothing at all, like “zoomâ€, “title†and “menu†and were very dependant on what you were doing.
Basic controls include volume, and the usual array of pause, play, skip and stop, repeat and search functions, numbers 0 -9, subtitle control and position, and the ability to zoom and rotate pictures as well as view thumbnails. While I am sure the annoying interface problems will be easily fixed with a firmware upgrade in the near future, this remote is one of the worst I have used in a long time, and I have 19 remotes in my “collection†right now! A larger, back lit, well laid out remote is badly needed here!
Poor remote aside, over all, this truly is a full media center in a very small HD box and it is an impressive product. The only thing really missing here for me was a TV tuner! La Cie, if you’re listening, I would love to see a USB turner option (in HD and standard TV) which powers the drive and plays through the USB connector. It should then be easy to add a PVR like function when the tuner is connected, recording the turner content directly to the drive for later playback, then this unit would becomes the ultimate media center for sure.
While doing some research on this device, I discovered a device in Europe called iZak from a company called “unibrain/†It was a Portable Multimedia Center that looked exactly like the LaCie device. Imagine my surprise to then note that the large ASIC chip on the circuit board of my unit also has the “unibrain†logo screened on it. So I thank LaCie for finding this device and bringing it to the US. Check out http://www.unibrain.com/iZak/ for more info, because they even tell you there how to make your own custom interface, which I’ll just bet works on this device as well. And while LaCie is importing this, they are put their own name on the device, which is good enough for me. I always buy equipment from a company I can trust, and I have always trusted LaCie products, so if their name is on it, I trust it to work well and last a long time, as well as be supported if it does break. As for the other cables this device supports, I suggest you look at Monster, Fry’s, Outpost.com, or some such other location that sells cables, as HDMI cables are supposed to be a new standard.
A few last items of interest:
There actually is a manual that comes with this device. It is a 63-page manual that is on the CD labeled “Utilities.†For the price of this unit, they should have put a real manual in the box. For the first few days, since I did not need any “utilitiesâ€, I never even looked at the included CD. It was quite helpful once I did, but THEY should have printed it out.
Speaking of price, while $249 may seem a bit steep for a 40 GB HD, given all it does, perhaps not so expensive after all.
I was disappointed that I could not power up this drive using the USB computer cable while also using it on my TV at the same time. Seems when the USB cable is connected to your computer, the outputs to the TV are disabled. Unfortunately for me, I had left the power brick at work on Friday and could not use it all weekend long while at home. Given that I want a MacMini connected to this device at all times to make my full home media center complete, I hope that they will change this “feature.â€
Annoyances aside, after only a few days of playing with this device, I really no longer cared about most of these small issues and just had a blast. If you want to easily watch your videos, digital pictures, and listen to you MP-3s on your TV and Stereo without needing a noisy computer near your TV, this is a great way to go. And given that the firmware is completely updatable, I expect new features to come along from time to time to make this even better and better.
MyMac rating: Easily a 4 out of 5. Include a better remote and I would rate this a solid 5 out of 5!

Leave a Reply
You must be logged in to post a comment.